How to Create a Ghost Mannequin Effect in Photoshop CC
If you deal in textiles or fashions, you want to sell them to third parties effectively. This can only happen if you give your clients a complete feel of the products way before they make a decision to purchase the said products or not.
They, for instance, ought to be able to ‘rotate’ the garments and observe the various features from the different angles and dimensions imaginable. To be able to achieve this, you have to invoke the assistance of the ghost mannequin photography technique.
Being obscure and way beyond the easy grasp of many would-be users, we have seen it necessary to step in and offer the necessary guidance.
Our overall goal in the discussions that follow shall be to walk you through the various steps, processes, and procedures necessary to shoot, capture, and edit the photos in Adobe Photoshop. These are the procedures that are necessary for generating the ghost mannequins.
It is our hope that at the tail end of the discussions you will be able to know exactly how to go about the entire business from start to finish without any external interventions.
Hire us today to create the Ghost Mannequin Effect for your photos?
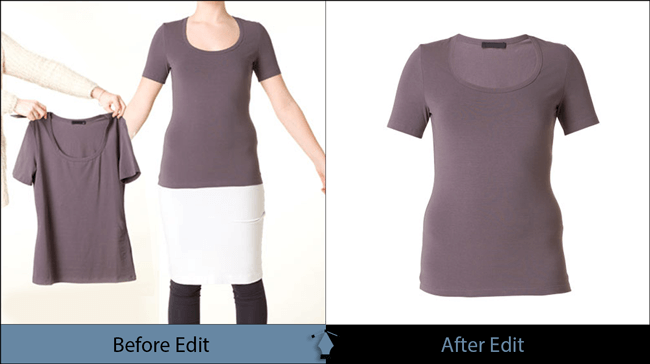
What is Ghost Mannequin Effect?
For a start, a ghost mannequin effect is a photography technique which reveals dimensions and parts of a product which would ordinarily be hidden from the view of a person by other kinds of tools and techniques. It gives the views the opportunity to zoom, rotate, magnify and diminish the sizes of products for the sake of enhanced legibility.
By reasons of these arrangements, the mannequins allow viewers to easily take note of the tiny details which they would not under normal circumstances. This technique is particularly handy and relevant in electronic commerce stores as it enables potential clients to window shop without having to visit the stores themselves.
These effects are produced by a combination of photography and video editing. To be able to generate them, you have to capture the actual photos of the real products. You thereafter have to use the image software editing tools to make some modifications here and there. Lastly, of course, you have to save the images appropriately for the sake of easy referencing.
2. Photographing the Product
As hinted above, the first and foremost procedure is to capture the photograph of the object you are intent on selling or promoting. The manner in which you do this has a bearing on the quality of the final outcome. This is why you have to exercise great caution.

To photograph the product, you have to follow the procedures laid down and explained in details below:
Related content: Jewelry Product Photography: Shooting and Editing Ring in Photoshop CC18
Acquire the various Tools and Equipment
Acquire the various tools and equipment that are needed for the job. These are the camera, tripod stand, lighting equipment, ghost mannequin, and the white background. You will need all of them to be able to a comparatively better job. You may seek the expert advice to be able to arrive at the best purchases possible.
Set Up the Studio Facility Appropriately
You now have to embark on the task of setting up the studio appropriately. To do this, place the background, the tripod stand and the lighting mechanisms where they are supposed to be. Block all the natural light from seeping into the studio facility. Do this by sealing every possible loophole which may let in light to the room.
Lighting
Now light the studio. Vary the intensity of the lights to be as bright as probably can be. This is to ensure maximum visibility and minimized blurs. If possible, you may also wish to direct the light to the specific portions of the image for the sake of enhancing its appearance on camera.

Camera
Now set the camera both on the tripod stand and by inputting the required parameters. To set on the tripod, place the stand at a comfortable height from the floor. This should ideally be in line with the product height to be able to capture the entire product in a single shot.
After this, you now have to set the various parameters. This simply means selecting the settings which are appropriate and relevant for the specific task of photography. These entail the zoom, flash mode, contrast, color, and brightness, among others.
It is these settings that ultimately determine the overall quality of the photograph. You, therefore, want to exercise added caution as you go about this business.
Shoot
You are now good to go! You should now take the shots as need be. You are advised to take at least two shots at a time for the sake of security. If you so wish, you may also rotate the image out and about to take as many relevant shots as possible.
Save or Transmit the Image
Lastly, you should either save or transmit the image to a remote server, depending on your preference. The best way to go about this business though is to do both. Save the images in your digital camera and at the same time transmit them to a remote server. This is the most effective arrangement for you as it safeguards against any possible losses of vital data.
Before creating the ghost mannequin effect in Photoshop determine if you need to touch up your photo. See some image editing services if you are not sure what to do.
A Step-by-Step Guide to Create Ghost Mannequin Effect in Photoshop CC
After capturing the shots, you now have to embark on the task of generating the ghost mannequins. As stated previously, this step entails the use of software editing tools to make some modifications. This is by far the more significant of the two procedures. It is long, complicated and very elaborate. Follow the procedures laid down below to make this dream a reality.
Import the images to your computer and proceed to open up the Photoshop. Once you are done, you have to follow the procedures stipulated below to edit the photos:
Step I: Open the front half of the image
Open the ‘front half’ of the image in Photoshop. Proceed to open the ‘Layers’ panel. You will observe that the image occupies the ‘locked background’ layer.
Step II: Unlock the background layer
Click the lock to unlock the ‘Background Layer.’ This will rename it ‘Layer 0.’ Assign an appropriate name to it by double-clicking the name tab.
Step III: Duplicate the layer
Right-click the ‘Layer’ and proceed to select the ‘Duplicate Layer.’ This duplication is necessary as it preserves the unmodified version of the original image just in case you make a mistake.
Step IV: Set the final background color
Create a new blank layer and assign it an appropriate name. Make use of the paint bucket tool to fill in the layers with white color. It shall constitute the background of the final image.
Step V: Set layers
Set your layers in such a manner that the ‘front’ portion occupies the top, the ‘background’ portion the middle whereas the ‘front backup’ at the very bottom. Do this by clicking and dragging these portions up and down appropriately.
Step VI: Use pen tool to remove the background
Now go ahead remove the background. Use a pen tool to create a path around and about the said product on its ‘front’ layer.
Step VII: Make selection
Click ‘Selection…’ which occupies the Photoshop palette. You will see some ‘marching ants’ appearing around the image.
Step VIII: Inverse the selection
Go to ‘Select,’ then to ‘Inverse’ at the top of the Photoshop window. These ‘marching ants’ will then ‘migrate’ around the background while leaving the product intact.
Step IX: Remove the background
Hit the ‘Delete’ button on the keyboard. This will make the product sit on the white background while your original photo stays hidden behind the white layer.
Step X: Open the back half of the image
Open the ‘back half’ of the photo in the Photoshop
Step XI: Name and backup the image
Name and backup the image using the procedures already stipulated above. You do not, however, need to create a background layer for this one.
Step XII: Use pen tool again
Use a pen tool to create a path round about the product
If you can’t create the path yourself you can outsource it to a professional clipping path service provider.
Step XIII: Make selection
Click ‘Selection…’ to be able to place the ‘marching ants’ round and about the product.
Step XIV: Copy the selected back half of the image
Copy the selected back half of the image. Do this by hitting the Ctrl + C or Command + C.
Step XV: Past the copied back half
Return to your ‘front half’ and then hit the Control + V to paste the layer. If you so wish, you may reorder the layers such that ‘back’ is behind the ‘front’ but the white background is behind both images.
Step XVI: Rese the back half
After selecting the ‘back,’ move it out and about and then resize it accordingly. Do the resizing by hitting Ctrl + T or Command + T. This will activate the transform tool to do the job. Hover the tool out and about until you find a perfect fit. You may also use the lasso tool to get rid of any bits which you do not want to appear in the final image.
Save the Mannequin appropriately
Now that you have obtained the final image, you should go ahead to store it appropriately. Just select the most suitable folder and file directory to do so. You should insist on only those storage folders that you may remember easily for the sake of easy retrieval. You are now good to go!
Now that you have gained the insight you so desperately need to go about this business successfully, why don’t you now take the first step to that end. All you need are the various co-operant tools and equipment like the studio facility, computers, and the associated software.
Given its success in enhancing the sales and promotion of the textile merchandise, ghost mannequin is a technique you just have to incorporate in your sales armory. It also pays to share this information as far wide as can be southafrica-ed.com/. You definitely want as many others to gain from it, don’t you?
Still not sure how to create a ghost mannequin effect for you photos?