Photo Editing tips, tricks and update to improve your eCommerce and product photography business.

Invisible-ghost-mannequin-effect-featured-image

How to Create a Ghost Mannequin Effect in Photoshop CC

If you deal in textiles or fashions, you want to sell them to third parties effectively. This can only happen if you give your clients a complete feel of the products way before they make a decision to purchase the said products or not.

They, for instance, ought to be able to ‘rotate’ the garments and observe the various features from the different angles and dimensions imaginable. To be able to achieve this, you have to invoke the assistance of the ghost mannequin photography technique.

Being obscure and way beyond the easy grasp of many would-be users, we have seen it necessary to step in and offer the necessary guidance.

Our overall goal in the discussions that follow shall be to walk you through the various steps, processes, and procedures necessary to shoot, capture, and edit the photos in Adobe Photoshop. These are the procedures that are necessary for generating the ghost mannequins.

It is our hope that at the tail end of the discussions you will be able to know exactly how to go about the entire business from start to finish without any external interventions.


Hire us today to create the Ghost Mannequin Effect for your photos?


What is Ghost Mannequin Effect?

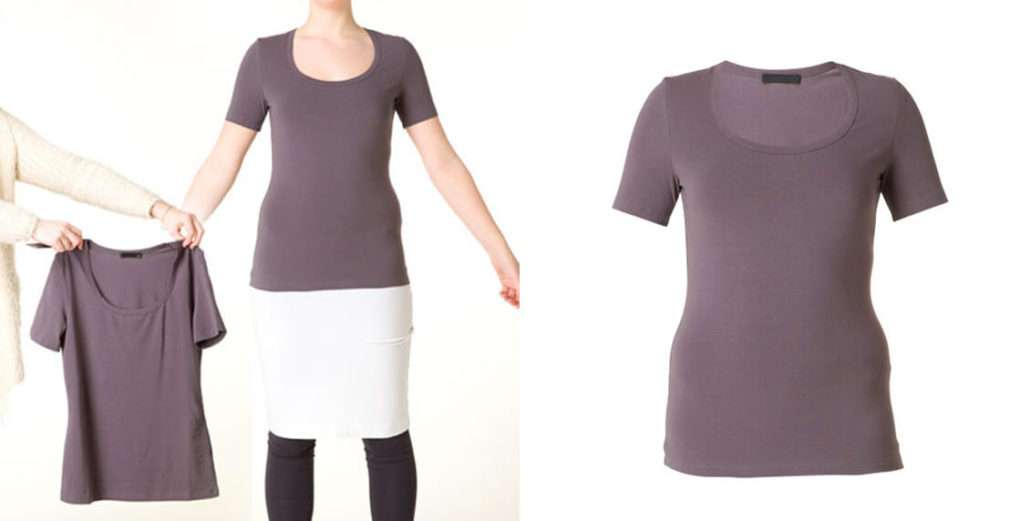
For a start, a ghost mannequin effect is a photography technique which reveals dimensions and parts of a product which would ordinarily be hidden from the view of a person by other kinds of tools and techniques. It gives the views the opportunity to zoom, rotate, magnify and diminish the sizes of products for the sake of enhanced legibility.

By reasons of these arrangements, the mannequins allow viewers to easily take note of the tiny details which they would not under normal circumstances. This technique is particularly handy and relevant in electronic commerce stores as it enables potential clients to window shop without having to visit the stores themselves.

These effects are produced by a combination of photography and video editing. To be able to generate them, you have to capture the actual photos of the real products. You thereafter have to use the image software editing tools to make some modifications here and there. Lastly, of course, you have to save the images appropriately for the sake of easy referencing.

2. Photographing the Product

As hinted above, the first and foremost procedure is to capture the photograph of the object you are intent on selling or promoting. The manner in which you do this has a bearing on the quality of the final outcome. This is why you have to exercise great caution.

To photograph the product, you have to follow the procedures laid down and explained in details below:

Related content: Jewelry Product Photography: Shooting and Editing Ring in Photoshop CC18

Acquire the various Tools and Equipment

Acquire the various tools and equipment that are needed for the job. These are the camera, tripod stand, lighting equipment, ghost mannequin, and the white background. You will need all of them to be able to a comparatively better job. You may seek the expert advice to be able to arrive at the best purchases possible.

Set Up the Studio Facility Appropriately

You now have to embark on the task of setting up the studio appropriately. To do this, place the background, the tripod stand and the lighting mechanisms where they are supposed to be. Block all the natural light from seeping into the studio facility. Do this by sealing every possible loophole which may let in light to the room.

Lighting

Now light the studio. Vary the intensity of the lights to be as bright as probably can be. This is to ensure maximum visibility and minimized blurs. If possible, you may also wish to direct the light to the specific portions of the image for the sake of enhancing its appearance on camera.

Camera

Now set the camera both on the tripod stand and by inputting the required parameters. To set on the tripod, place the stand at a comfortable height from the floor. This should ideally be in line with the product height to be able to capture the entire product in a single shot.

After this, you now have to set the various parameters. This simply means selecting the settings which are appropriate and relevant for the specific task of photography. These entail the zoom, flash mode, contrast, color, and brightness, among others.

It is these settings that ultimately determine the overall quality of the photograph. You, therefore, want to exercise added caution as you go about this business.

Shoot

You are now good to go! You should now take the shots as need be. You are advised to take at least two shots at a time for the sake of security. If you so wish, you may also rotate the image out and about to take as many relevant shots as possible.

Save or Transmit the Image

Lastly, you should either save or transmit the image to a remote server, depending on your preference. The best way to go about this business though is to do both. Save the images in your digital camera and at the same time transmit them to a remote server. This is the most effective arrangement for you as it safeguards against any possible losses of vital data.

Before creating the ghost mannequin effect in Photoshop determine if you need to touch up your photo. See some image editing services if you are not sure what to do.

A Step-by-Step Guide to Create Ghost Mannequin Effect in Photoshop CC
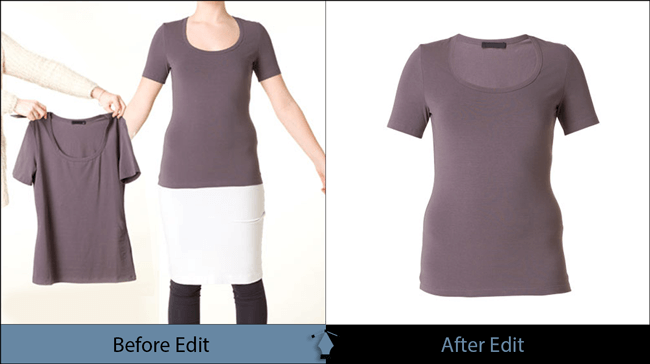
After capturing the shots, you now have to embark on the task of generating the ghost mannequins. As stated previously, this step entails the use of software editing tools to make some modifications. This is by far the more significant of the two procedures. It is long, complicated and very elaborate. Follow the procedures laid down below to make this dream a reality.

Import the images to your computer and proceed to open up the Photoshop. Once you are done, you have to follow the procedures stipulated below to edit the photos:

Step I: Open the front half of the image

Open the ‘front half’ of the image in Photoshop. Proceed to open the ‘Layers’ panel. You will observe that the image occupies the ‘locked background’ layer.

Step II: Unlock the background layer

Click the lock to unlock the ‘Background Layer.’ This will rename it ‘Layer 0.’ Assign an appropriate name to it by double-clicking the name tab.

Step III: Duplicate the layer

Right-click the ‘Layer’ and proceed to select the ‘Duplicate Layer.’ This duplication is necessary as it preserves the unmodified version of the original image just in case you make a mistake.

Step IV: Set the final background color

Create a new blank layer and assign it an appropriate name. Make use of the paint bucket tool to fill in the layers with white color. It shall constitute the background of the final image.

Step V: Set layers

Set your layers in such a manner that the ‘front’ portion occupies the top, the ‘background’ portion the middle whereas the ‘front backup’ at the very bottom. Do this by clicking and dragging these portions up and down appropriately.

Step VI: Use pen tool to remove the background

Now go ahead remove the background. Use a pen tool to create a path around and about the said product on its ‘front’ layer.

Step VII: Make selection

Click ‘Selection…’ which occupies the Photoshop palette. You will see some ‘marching ants’ appearing around the image.

Step VIII: Inverse the selection

Go to ‘Select,’ then to ‘Inverse’ at the top of the Photoshop window. These ‘marching ants’ will then ‘migrate’ around the background while leaving the product intact.

Step IX: Remove the background

Hit the ‘Delete’ button on the keyboard. This will make the product sit on the white background while your original photo stays hidden behind the white layer.

Step X: Open the back half of the image

Open the ‘back half’ of the photo in the Photoshop

Step XI: Name and backup the image

Name and backup the image using the procedures already stipulated above. You do not, however, need to create a background layer for this one.

Step XII: Use pen tool again

Use a pen tool to create a path round about the product

If you can’t create the path yourself you can outsource it to a professional clipping path service provider.

Step XIII: Make selection

Click ‘Selection…’ to be able to place the ‘marching ants’ round and about the product.

Step XIV: Copy the selected back half of the image

Copy the selected back half of the image. Do this by hitting the Ctrl + C or Command + C.

Step XV: Past the copied back half

Return to your ‘front half’ and then hit the Control + V to paste the layer. If you so wish, you may reorder the layers such that ‘back’ is behind the ‘front’ but the white background is behind both images.

Step XVI: Rese the back half

After selecting the ‘back,’ move it out and about and then resize it accordingly. Do the resizing by hitting Ctrl + T or Command + T. This will activate the transform tool to do the job. Hover the tool out and about until you find a perfect fit. You may also use the lasso tool to get rid of any bits which you do not want to appear in the final image.

Save the Mannequin appropriately

Now that you have obtained the final image, you should go ahead to store it appropriately. Just select the most suitable folder and file directory to do so. You should insist on only those storage folders that you may remember easily for the sake of easy retrieval. You are now good to go!

Now that you have gained the insight you so desperately need to go about this business successfully, why don’t you now take the first step to that end. All you need are the various co-operant tools and equipment like the studio facility, computers, and the associated software.

Given its success in enhancing the sales and promotion of the textile merchandise, ghost mannequin is a technique you just have to incorporate in your sales armory. It also pays to share this information as far wide as can be southafrica-ed.com/. You definitely want as many others to gain from it, don’t you?


Still not sure how to create a ghost mannequin effect for you photos?


Jewelry Product Photography: Shooting and Editing Ring in Photoshop CC18

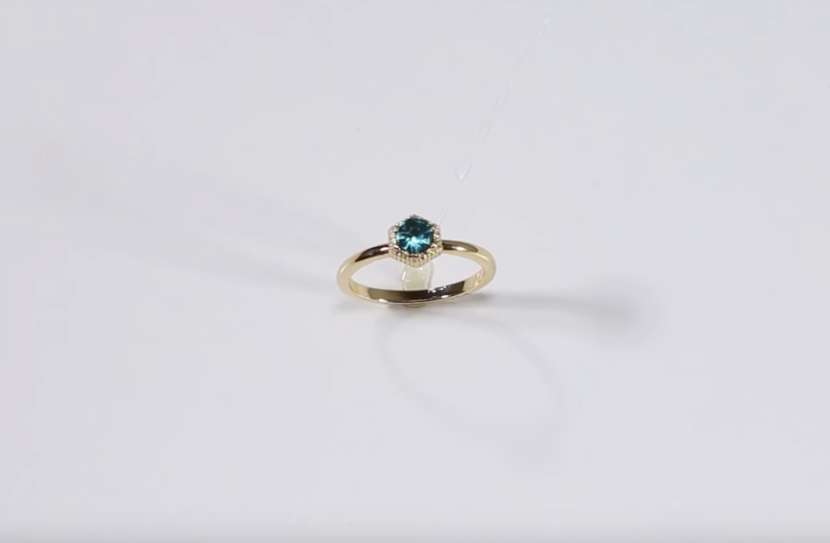
Jewelry Product Photography is a niche field that requires skill, knowledge, and patience. Capturing the perfect image of jewelry can prove to have its challenges. When equipped with the right tips, tools, and steps even a novice photographer would be able to take create astonishing photos.

Here are 60 photography sites with amazing product photos that inspire.

Jewelry product photography and editing tips:

There are a number of factors that are relevant when it comes to jewelry photography such as the lenses, angles, and tools. Here are some easy to follow, shooting and image editing tips to consider.

1. Choose a Best Lense

Macro lenses work best for jewelry product photography. They work great to capture fine details of small pieces of jewelry such as rings. The 100mm f2.8 lens is the chosen favorite. It has a shallow field of depth but works great for rings. A great choice for cropped sensor cameras is the 60mm f2.8 EFS lens.

2. Clean the sample

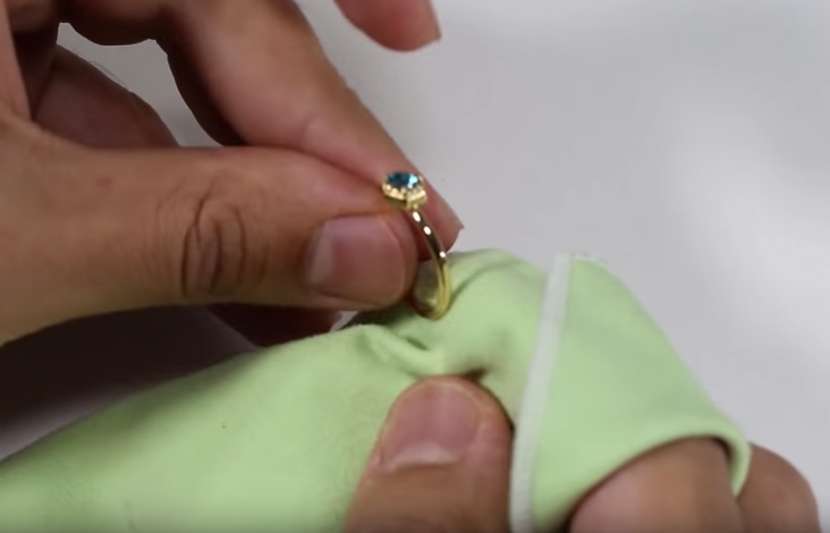
Always clean the jewelry before you begin your shoot. The jewelry may have oil, fingerprints, etc. which could alter the photograph. Rubbing alcohol and a microfiber cloth is perfect to clean the shank and setting area. Q-tips work well but can leave fibers in the setting area around the gem so be careful.

Clean the sample

3. Use a large whiteboard

Use a large whiteboard or piece of acrylic to work on when shooting. The larger the board the better. The board will reflect in the lower shank of the ring. When shooting reflective objects, look at it from the angle you plan on shooting from and use your finger to trace what is being reflected.

4. Use hot glue gun

To hold the ring in place, a hot glue gun works best. It’s quick and simple to get the ring set into place and when the glue dries, the hold is very sturdy. This is helpful when you need to make any last minute touch-ups to the ring.

Use a hot glue gun for ring

The glue peels off from the metal of the ring easily leaving no streaks or residue on the metal. 4. Sometimes clients will use floor samples for jewelry product photography. It’s a good habit to practice not getting the rings too dirty.

5. Lighting setup

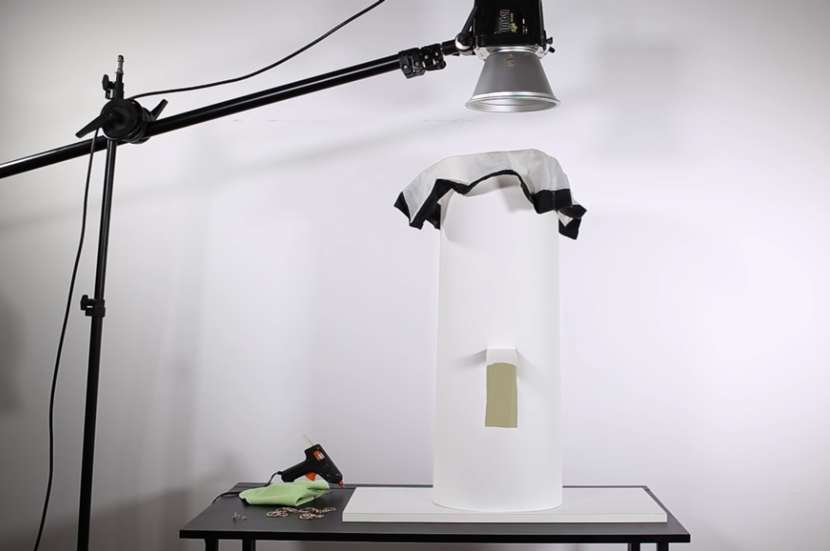
Roll a large piece of white paper into a tube but leave a small window for the camera. This is perfect for rings because it evenly fills the entire surface although it has a low contrast look. This is great for shooting a high volume of jewelry product photography for e-commerce. For high-end editorial photos, you need a balance of white and black.

Lighting setup in studio

One light with a piece of diffusion to diffuse the light. This setup works well with a softbox or any other modifier. Bare bulb setup works best. Harsh light may be necessary to capture contrasts of the gems and composite the gems into the body of the ring later in photoshop.

Clients will want various angles of the ring. Create multiple tubes with windows at various angles for different views and client requested angles for jewelry product photography.

When the ring is clean and set in place, frame up on the ring. You can see the dark reflections without the tube. Once the tube is placed there is an even fill around the ring with highlights from the top of the tube.

6. Perfect Angles

For jewelry product photography standing at the 45-degree angle, the window is much higher with the camera pointed almost straight down. The shank of the ring is at an angle with the gem slightly off centered.

For front angles, glue the ring to the acrylic earring stand. This is easier and doesn’t require the lens to be pointed straight down. The stand is tilted and supported with erasers. Frame up on the ring then place the tube. Window in this tube is lower and eliminates dark spots in the inner shank of the ring.

For side angles, use a tube with a window on the very bottom which looks like a mouse hole. Sometimes a small white piece of paper may be needed to reduce some of the reflection from the shank. Works well with other side angles leaving a small reflection grin the camera in the shank.

7. Focus Stacking

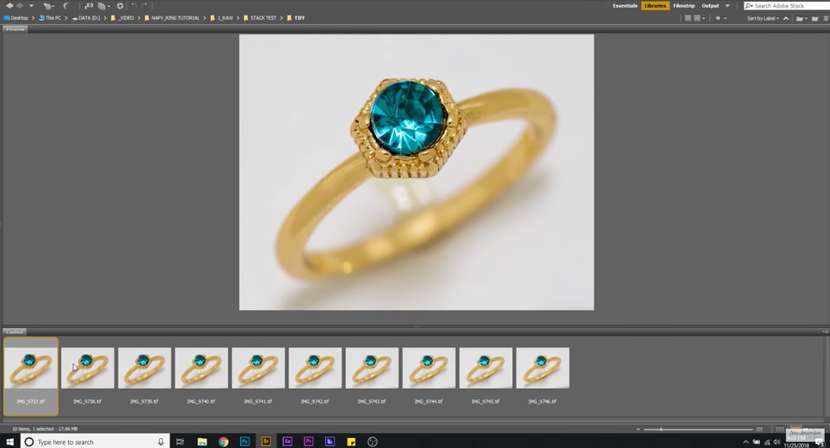
This is a must when doing jewelry product photography for rings with macro lenses. Focus stacking is a series of images at different focus distances and using software to merge the images together to make a fully in-focus image.

Focus stacking the ring image

You can use a focus stacking rail that physically moves the camera back and forth to take the series of images, but turning the focus lens works just as well. These are additional image editing tips for focus stacking:

  • Make sure there is no camera shake from focusing the lens. The preferred method is to shoot tethered and use the camera tether software to move the focal plane. Using F8 or F11 to shoot each image gives the sharper aperture for most lenses.
  • Start at the front of the object and work your way back. Using the Canon EOS utility software the focal plane can be moved at small increments and photos can be taken at each increment.
  • When doing jewelry product photography of rings you typically end up with 6-10 images depending on the size of the ring and the amount of detail you want to capture in the shank.
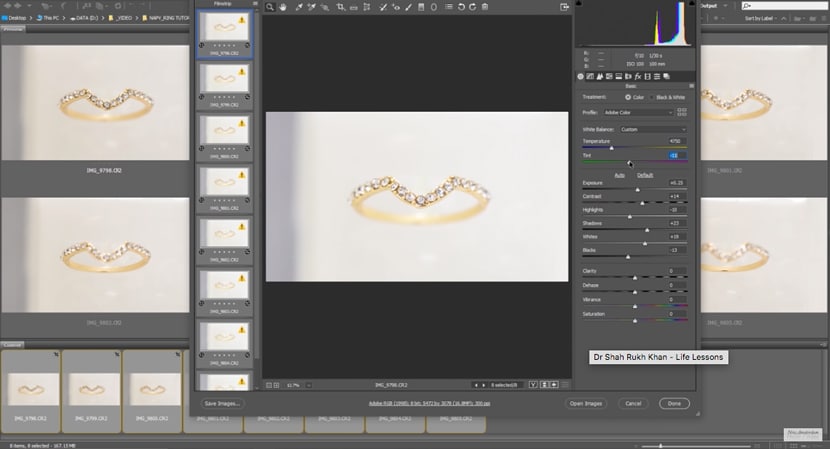
  • Once the images are set, batch edit the raw images. This is necessary to do minor exposure, contrast, and white balance adjustments. Do not adjust clarity or sharpness at this point so dust and blemishes are not made more obvious.
  • Save the images in .tif or .psd format since focus stacking the raw files can be slower than using .tif format.

8. Focus Stacking with Photoshop

Focus stacking ring image with Photoshop

There are several steps for focus stacking images with Photoshop:

  • Select File, then Scripts, and Load Files Into Stack.
  • Browse and locate image files you want to merge.
  • Select all image files and select ok.
  • Check the box to attempt to automatically align source images. Which will make small adjustments to the image and make them perfectly aligned. Very useful if there are micromovements between shots.
  • Photoshop will process the images and load them into layers. Clicking through the layers you can see each area of the ring that is in focus. The software will stitch each portion together.
  • Select all layers and go to Edit and click Auto-Blend Layers.
  • Select stack images.
  • Click the box next to seamless tones and colors to fix minor exposure changes between shots.
  • Select ok.
  • Once the stitching is complete, it will make a merged layer at the top with all the images stitched together.
  • If there are any blurry areas that the software could not stitch, you can adjust the layer mask manually.
  • Adjust the layer masks or using the clone stamp to stamp over the blurred areas.

Image Editing Tips and Steps

There are a number of factors that are relevant when it comes to editing jewelry product photography in Photoshop such as background remove, cleaning, retouching, sharpening, color correction etc. Here are some easy to follow, image editing tips to consider.

1. Remove the background

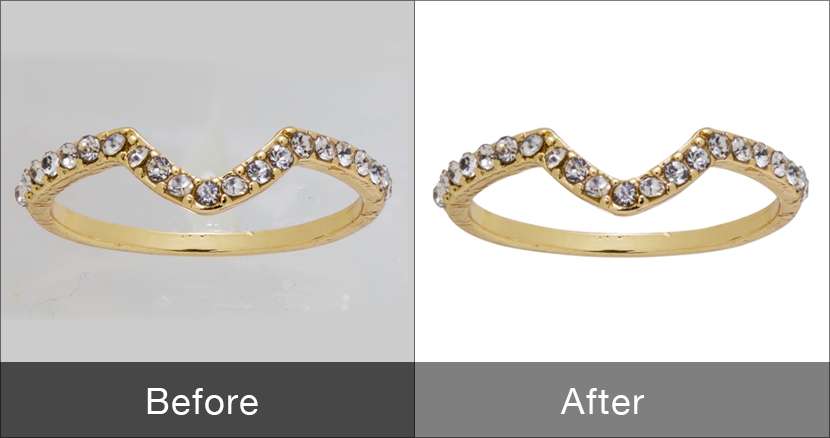
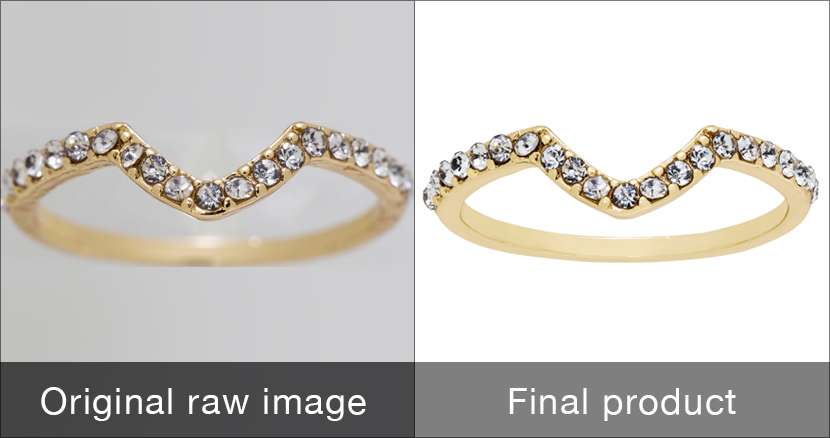
First step is to remove the background of the ring image and make the background white. Pen tool in Photoshop CC18 is the best way to create path around image and then change the background to white like the below image.

Remove the background of ring image

Here are the steps on using pen tool to create path.

  • Press P to select the pen tool. Make a path using the pen tool to cut out the image.
  • Use the left mouse click to create an anchor point to start your path.
  • Click again to create send anchor. Points are connected with a segment.
  • When you make an anchor point, you can hold the left mouse button and drag to alter the shape of the segment which allows you to trace the ring accurately.
  • When you click and drag the anchor point, there are two arms that pert rude from the anchor point. One allows you to change the line segment connecting to the anchor point. The other allows you to change the next segment it will connect to.
  • Hold Alt/Option to click and drag the anchor point to make changes to the segment you’ve already made.
  • Make two anchor points and place a third in the middle of the segment and use Ctrl/Command to drag the anchor point. This allows you to drag the segment around. You can make unlimited anchor points but don’t make them too close together.
  • Some parts are easy to make segments on like the stones. You only need to click along each corner. 9. Curved areas take more practice since you need to alter the segment. For the shank, you only need a few anchor points and large segments since it is a long curve.
  • Create anchor points and segments around the ring until you reach the first anchor point to close the path.
  • When the outer path of the ring is complete, go to the path window to see the path of your work.
  • Have the work path selected and select the hamburger symbol (three horizontal lines) and select the save path.
  • Name the path.
  • Once the outer path is saved, deselect the outer path and create a new path on the inner area of the ring.
  • Make a new layer and keep it on the top of all other layers.
  • Select both paths.
  • Select the outline circle symbol in the path window to turn the paths into a selection.
  • Press the rectangle with the circle symbol to create a layer mask on the layer. The layer mask will hide anything that is outside of the selection.
  • Press Shift + F5 to open the fill window and fill the layer with white. The ring is now isolated on a white background.

Creating path around a ring only takes a few moments but the time must be factored into the editing time of images. Some offshore clipping path and image editing service providers on the web will create paths for your images and return them the next day in affordable pricing. Pricing for clipping path services can be integrated into jewelry product photography pricing.

Here’s how much does clipping path cost when outsourcing.

2. Touch-Ups

Touch up the ring image in Photoshop
  • Using the brush set to 0% hardness at 30% opacity works best and fastest.
  • Create a new layer, set the blend to lighten.
  • Use Alt/Option to sample the gold color from the ring and start painting along the shank.
  • When using the lighten blend mode, it won’t cover any areas that are brighter than the color you selected.
  • Target settings and other areas of the ring. For heavy dark spots, use the brush at 100% opacity.
  • Use brush at 30% opacity and alternate between highlight and normal tone to create a natural gradient.
  • More highlights on the inner shank to keep the ring from looking flat.
  • Add noise to the layer to make it more natural once you are satisfied with the lightning.
  • Select Filter, select Noise, click Add Noise.
  • Add noise with a low percentage of 1% or less.

3. Cleaning

The lighten layer is the quick pass. The second layer is for in-depth refinements. Use the brush tool at 10 to 30% opacity. The clone stamp tool should be used with low opacity. Focus on the stones and fix them one at a time. Darker areas of the stones will be filled with low opacity brush that selected the dark color. Stones need contrast.

A useful photo editing tip is to use the clone stamp tool to remove additional marks, fix highlights on edges of the shank. Use the brush tool to smooth out rough highlights from tarnish that the light layer didn’t fix. Add color to the desaturated areas of the inner shank. A small brush with 0% hardness should be used to refine the edges of the shank and smooth them out.

4. Add Some Color

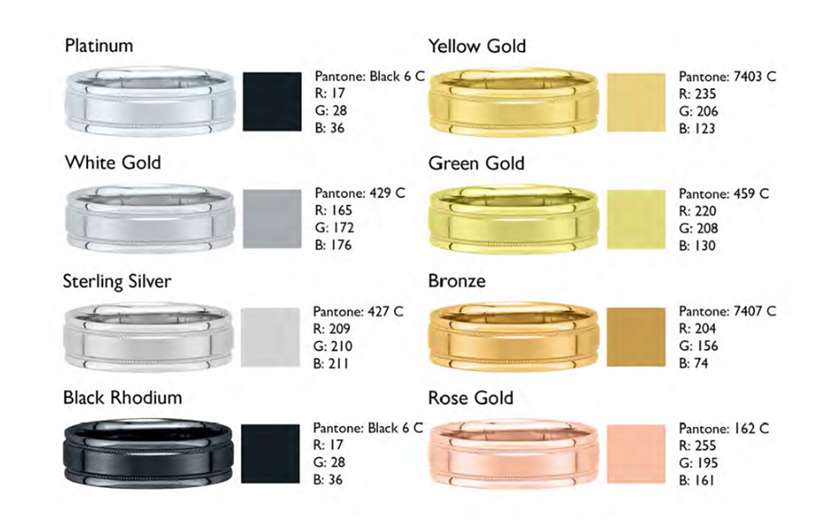
Jewelry product photography clients tend to provide a style guide to ensure the proper colors are selected. Since this is a gold ring, use Yellow Gold, Pantone: 7403 C.

Color guide

Coloring the image is a very simple task using the layer set to the color blend mode. After coloring the image will be like the below one.

Here are the steps of how to color a ring image in Photoshop.

  • Create a new layer to select the gold color.
  • Click on color selection on the bottom of the toolbar to open the color picker.
  • Click color libraries.
  • Select coated/uncoated Pantone library.
  • Scroll for color 7403.
  • Select color and press ok.
  • Use a large brush and paint over the entire area of the ring.
  • Blend mode drop-down menu in layers window and select color blend mode.
  • Remove access gold from gems.
  • Select layer and press rectangle with circle symbol to create a layer mask.
  • Select the layer mask and use the brush to paint away the gold color.
  • Use 20-40% opacity depending on how the metal was shot and how saturated it looks.
  • Select the layer mask of the gold layer just created.
  • Right click on the mask and select add mask to selection.
  • Create a new layer and press the layer mask symbol to create a layer mask on the layer.
  • Since this mask is hiding the stones invert the layer mask (Ctrl + 1/Command +1) while selecting the mask to invert it. Now the mask is only selecting the stones.
  • Go to the color picker and locate the 5405 Pantone color for the stones.
  • Paint the color over the stones.
  • Select the color blend mode.
  • Change the opacity to 15%.
  • Use the same layer masks to create curves layers to change the exposure on the metal of the ring and the stones.
  • Right-click mask of gold color and add a mask to selection. Then create another curves layer.
  • Do the same to make another curve layer for the stones.
  • Make sure the exposure adjustments are below the color layers so the colors are not changed.
  • Create an S curve for the stones so they pop more.
  • Do the same for the metal but boost mid-tones as well.
  • Layer masks can be used on other layers to make more adjustments to specific areas.

6. Sharpen the Image

Sharpening is best left for last when all of the smoothing and retouching has been completed. This will allow for a consistent sharpening of the entire image. Use the high pass filter set to a hard light blend mode.

  • Select the original ring layer and then retouching layers.
  • Press Ctrl + J/Command + J to duplicate the three layers.
  • Ctrl + E/Command + E to merge the layers into one.
  • Select Filter, select Other, and select High Pass Filter. Toggle the filter to a higher pixel amount so that it is a little over sharpened.
  • Change blend mode on the layer to hard light.
  • Toggle layer with opacity slider to find right sharpness.
  • Zoom in to see what the sharpening is doing and toggle until it is just right.
  • To crop the image, select Image and select Trim. Trim away all sides.
  • Use Ctrl + Alt + C/Command + Option + C to open the canvas size window.
  • Select Relative and add 1 inch all around.
  • Open canvas size menu again to copy width of the image and apply it to the height to make it a square image.
  • Flatten it to reduce file size or save with layer to make future adjustments.

7. Final Correction

Fixing an improperly set stone. When the ring is symmetrical it is an easy fix.

  • Select the same stone on the opposite side with a lasso tool.
  • Drag lasso tool around the stone.
  • Ctrl + C/Command + C to copy.
  • Ctrl + V/Command +V to paste in a new layer.
  • More selection to the area where we want to place the copied stone.
  • Select Edit, select Transform, and select Flip Horizontal.
  • Use lower opacity to place the stone.
  • Place the layer mask on the stone.
  • Invert the layer mask and brush the stone into place.
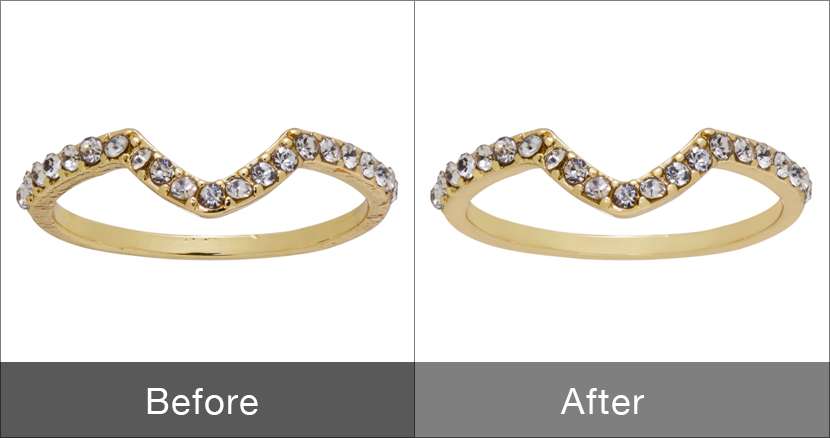
Original raw image and final product

Jewelry product photography comes with its own set of difficulties. Knowing how to get around those difficulties make the photographs that much better. Although rings are difficult to photograph, fantastic images are possible to capture.

These simple image editing tips are easy to follow and will help you create photos that will wow your clients. White backgrounds are easy to shoot and produce phenomenal jewelry product photographs. Clients tend to prefer multiple angles to showcase the dimensions of the jewelry. Shooting and editing ring in photoshop can present challenges to someone unfamiliar with the process. Practice makes perfect and the more you go through the process, this simple process gets even easier.

Want even more of an advantage? Use Background Remove’s image editing services to reduce your editing and turnaround time.

Learn how to outsource image editing for ecommerce.

Banner image of make image background transparent

Make Image Background Transparent With These 5 Photoshop Tools

Do you have a great image whose appearance you would wish to enhance? If you did answer yes, then you have to know the five Photoshop tools that can make image background transparent. These tools are generally very effective and ideal for professional use.

Whether you are a Commercial Photographer or an online retailer, shooting product photos and selling them online. Sometime you need to remove the background of your product photos or edit them to increase online sales or meet Amazon or Ebay guideline. To make image background transparent satisfactorily, you must of necessity use only the right tools. This is because the standards that are expected out of such exercises are way very impeccable. You therefore just cannot afford to gamble with this exercise.

Learn how to write perfect ebay product description following some easy steps

5 Photoshop Tools to Make Image Background Transparent:

  1. Magic Wand Tool
  2. Quick Selection Tool
  3. Pen Tool
  4. Background Eraser Tool
  5. Channel Mask

These tools form the basis of our subsequent discussions. We have already identified and are going to examine briefly the top five Photoshop tools which you may help you out.

1. Magic Wand Tool

The Magic Wand Tool, known simply as the Magic Wand, is one of the oldest selection tools in Photoshop. Unlike other selection tools that select pixels in an image based on shapes or by detecting object edges, the Magic Wand selects pixels based on tone and color.

To use this tool, to make image background transparent, follow these simple steps:

Step I: Open the Image and Make a Duplicate Layer

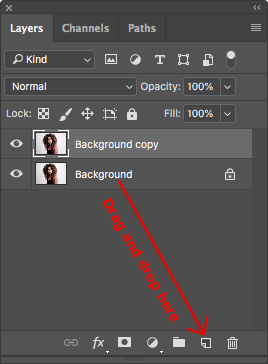
Start off by opening the image you are interested in handling. Proceed to save a copy of the image just in case it might get lost. Follow this by duplicating the image layer. This is to make it possible for you to fix any problem later.

Open the image in Photoshop CC18

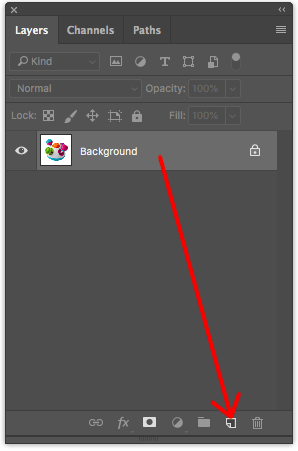
To do this, hold down the background layer and drag and drop it to the new layer option at the lower portion of the layer panel.

T0 make a duplicate layer drag-and drop the background layer

Step II: Select the Magic Wand Tool

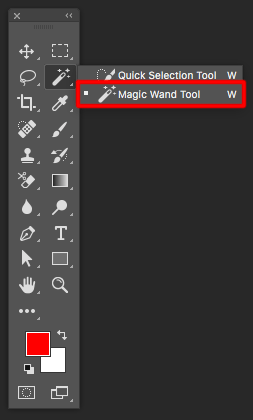
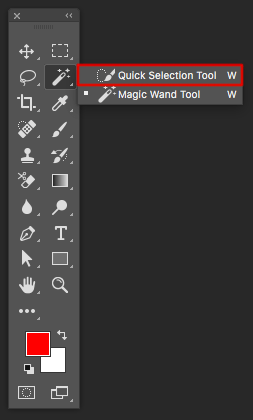
Now select the magic wand tool. Go to the left panel in the Photoshop menu for the tool bar.

Magic wand tool

Step III: Select Background Area of the Image

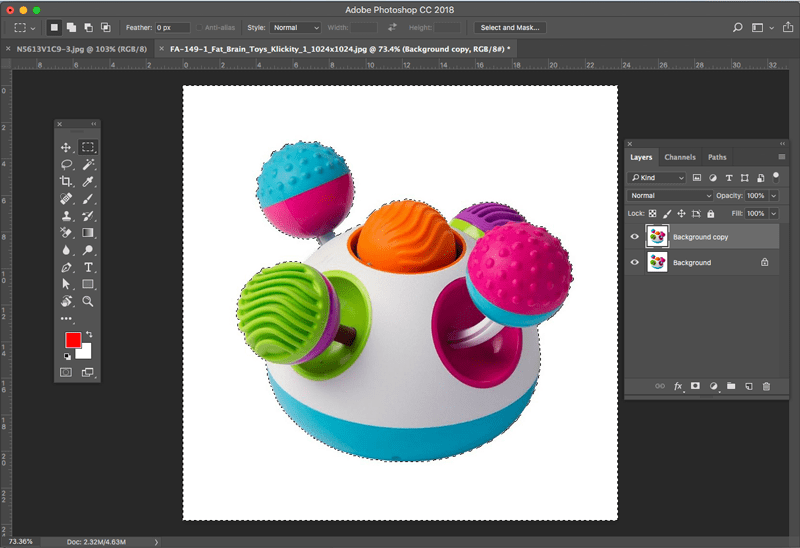
You now have to select the portion of the image you intend to make transparent. To do this, grab the magic wand tool and click on any portion of the background area. This will automatically delineate the outlines or boundaries of the background you intend to make transparent. Once done, you will see some broken lines blinking around the outlines of the images.

Select background area by magic wand tool

Step IV: Click ‘Delete’

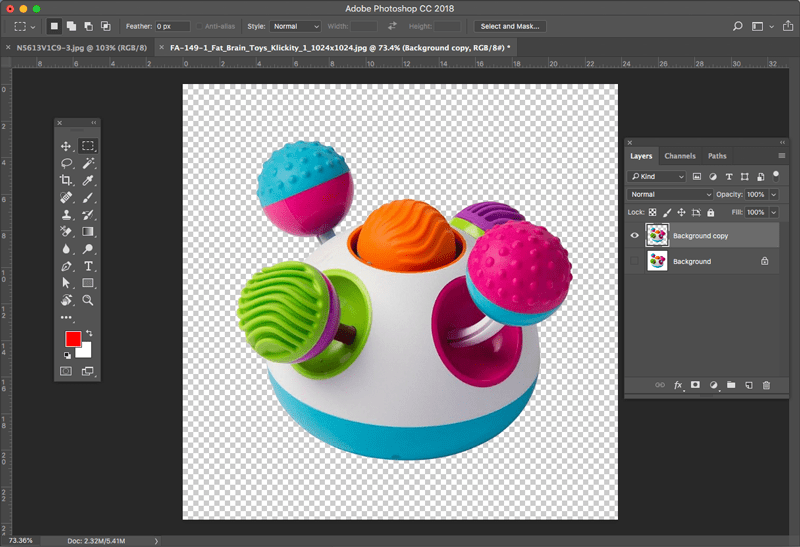
After you are through with selecting the background, click the ‘delete’ button on your keyboard. The background you narrowed on should now be transparent.

Press the delete button from keyboard to make transparent the selected area

Please note that transparency in this sense does not infer the ability to see through. In fact, you will see a faint checkered pattern in the space between the image outline and the frame that encloses the image.

Step V: Make Final Touches

In case after the above step some portions of the image background remain non-transparent, follow the first three procedures ab second time. This should be able to fix the problem. You may also consider going manual or step by step as a final measure.

Step VI: Save the Image

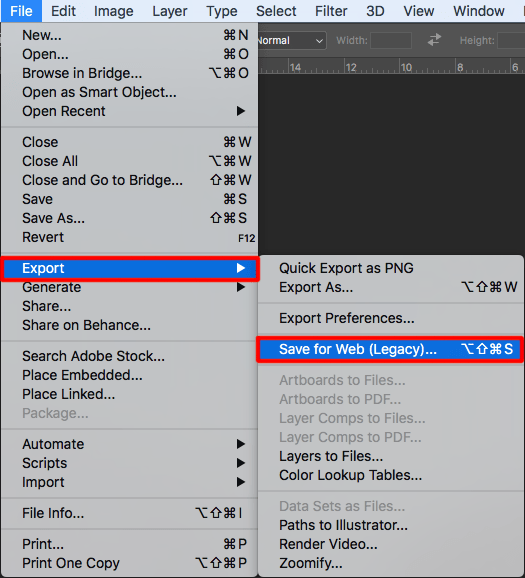
Finish off by saving the image. To do so, click the ‘File’ main menu and then select ‘Save for Web (Legacy)’ from the File drop-down menu. Thereafter, select the image and then conclude the process by clicking ‘save.’

Save the image using save for web and device

2. Quick Selection Tool

This tool is so called as it can allow you to quickly select the exact portion of an image you are interested in. It has a brush tip that is adjustable and round in shape. You engage this tool by dragging it. In the process, it expands outwardly. It is designed to find and follow the defined paths and edges automatically. To use it to make image background transparent, follow the procedures laid out below:

Quick Selection Tool

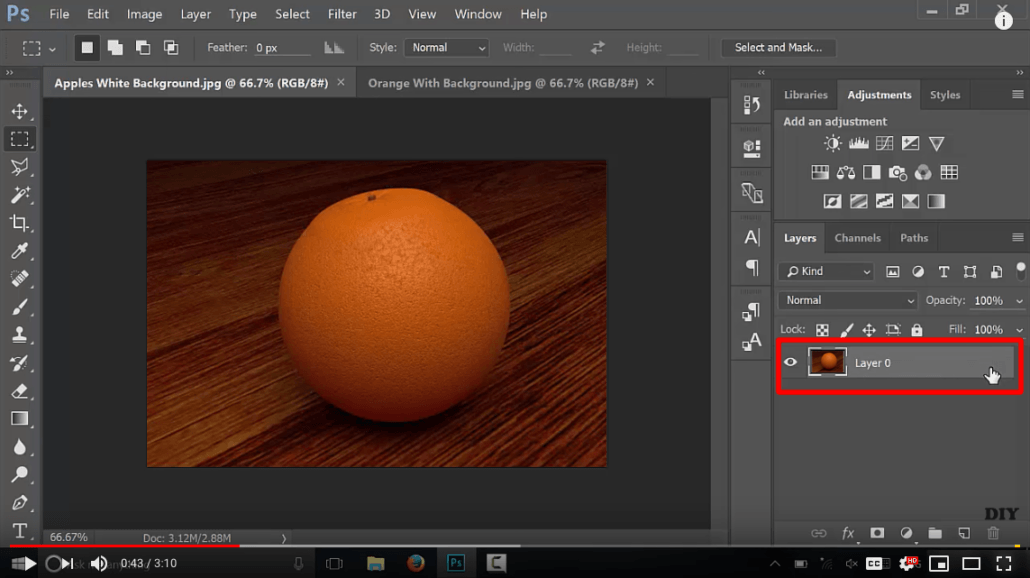
Step I: Unlock your Photo layer

Unlock the photo layer and generate a duplicate of the selected image. Simply click save as and then assign the duplicate a unique name. This will provide a back-up of the image and secure it against unnecessary loss.

Unlock the background layer of orange image

Step II: Select the Portions of the Foreground Image you want to Retain

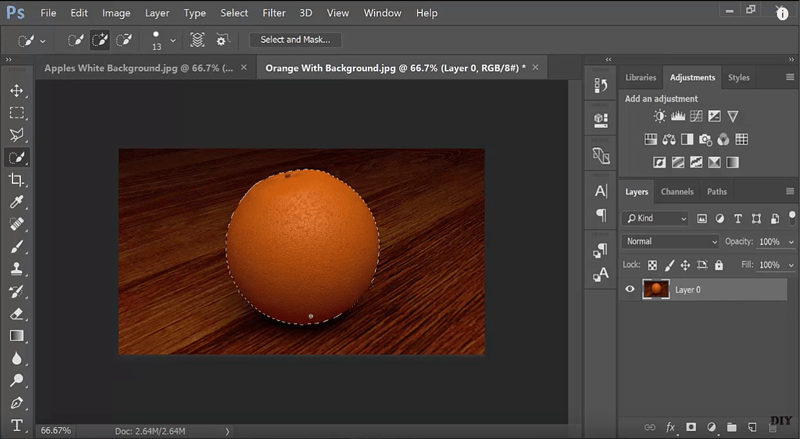
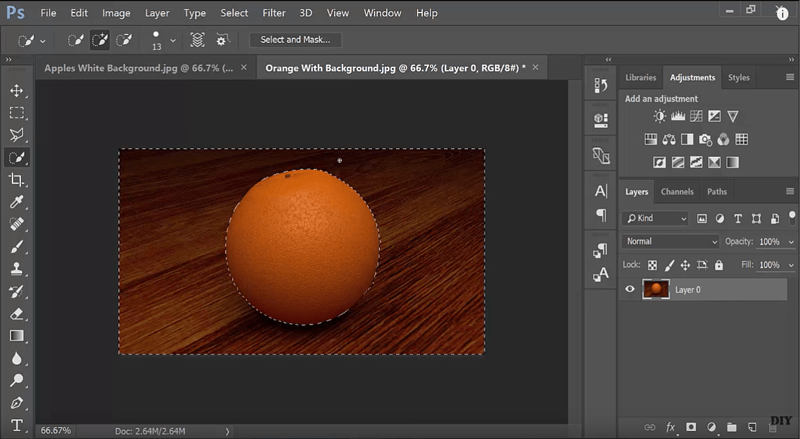
Now select the portions of the foreground image you intend to retain. This is where the quick selection tool comes in handy. Simply go to the ‘Tools Palette’ to activate this tool. Next, drag the tool around the boundary of the parts of the image you are interested in.

Select the foreground portion of the image using quick selection tool

Step III: Inverse your Selection

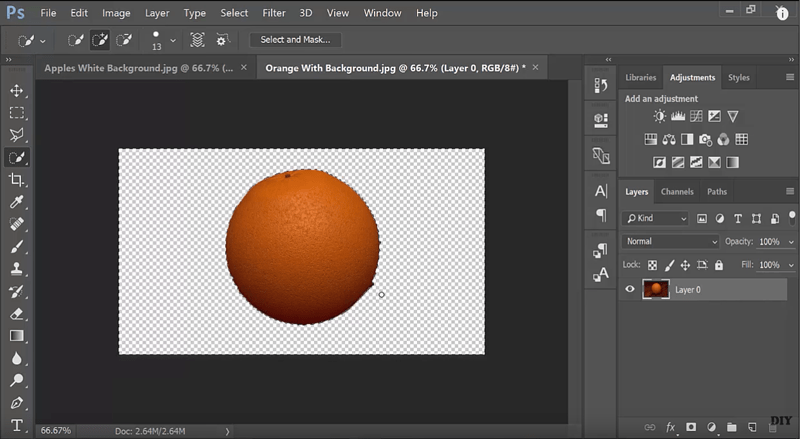
Press Command + Shift + I or click Select then Inverse. This will enclose the image you are interested in and leave behind the background untouched.

Inverse the selection to select the background portion

Step IV: Effect the Change

Press ‘delete’ button from you keyboard to make the image background transparent.

Press delete button to delete the selected area

Step V: Refine the Edges of the Foreground Objects

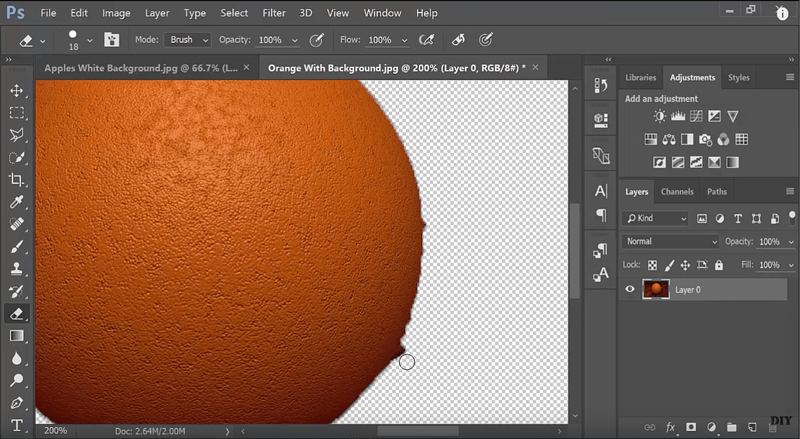
Proceed to refine the edges of the foreground objects. Use the eraser tool to do this. Select the eraser tool to use it on the area you wish to refine.

Refine edge using eraser tool

Step VI: Final Image

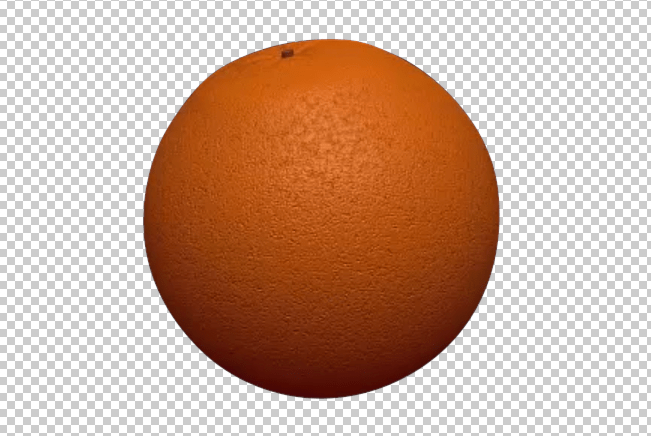
You may, if you so wish, enhance the edge more to make it high quality and final image will look like this.

Final image with transparent background

3. Pen Tool

This tool resembles a pen. It is frequently used to create smooth edges of the selected images. It generates vector paths which convert into selections which may, in turn, be used to extract or mask out groups of pixels. It can also make image background transparent. To use it for this purpose, follow the steps laid out below:

Related content: Learn how much does clipping path cost to outsource.

Step I: Open the image in Photoshop

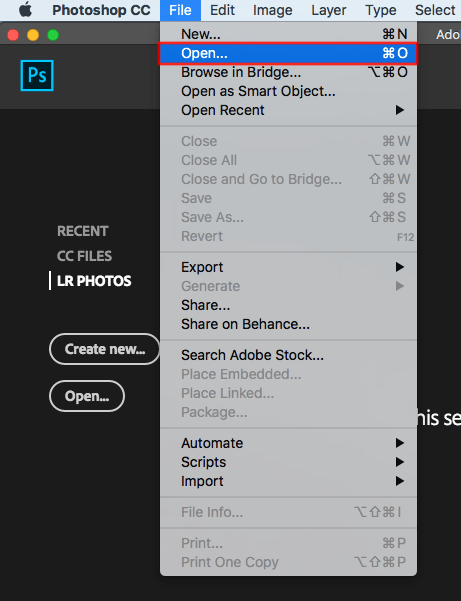
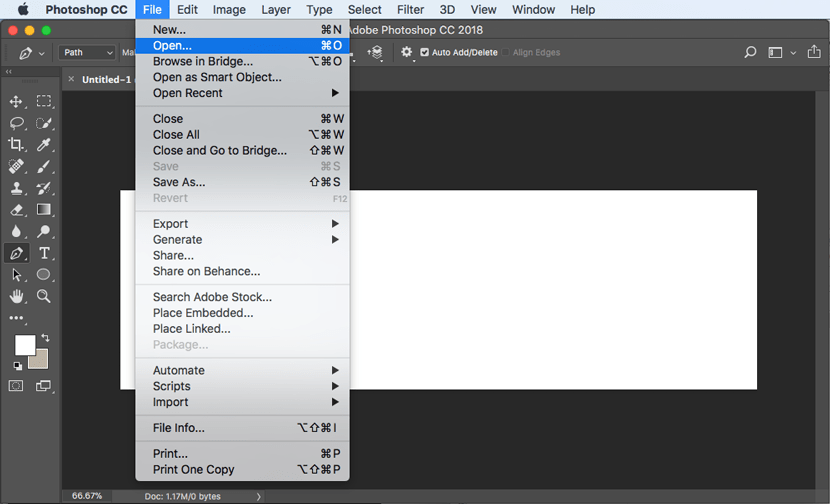
To do this, go to the menu and click ‘File.’ On the drop-down menu, click ‘open.’ You may also use the ‘Command + O’ on your keyboard to achieve this very end.

Open option in Photoshop CC18

Step II: Select Pen Tool

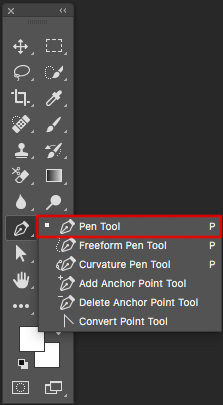
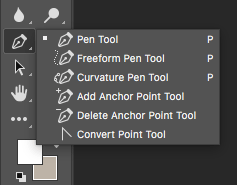
Activate the pen tool. Go to the Toolbox and select the ‘Pen Tool’ option. You may also use the ‘P’ key from the keyboard as an alternative.

Pen Tool

Step III: Draw the path

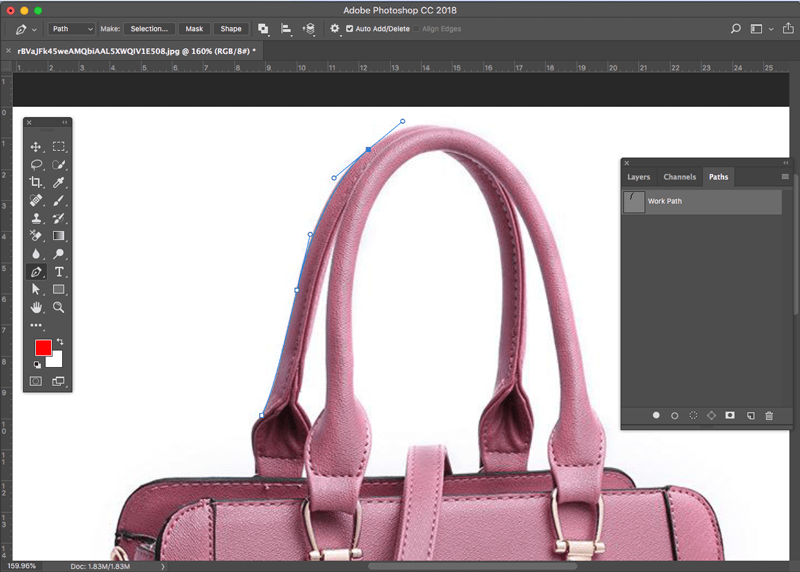
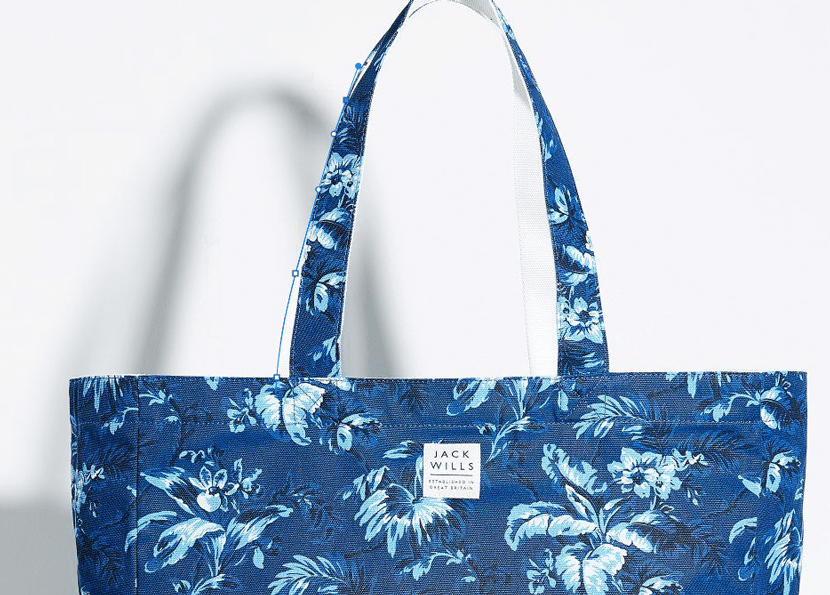
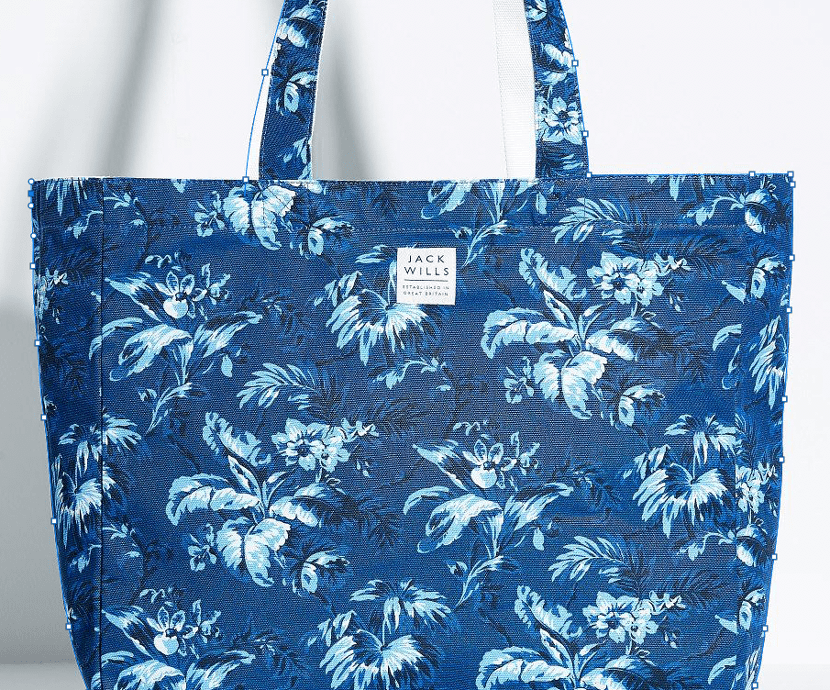
Next, draw the path of the enclosure around the object of interest. Press the mouse button on the edge of the specific object which you intend to cut within the image. Drag the mouse around the object and release it once you are through.

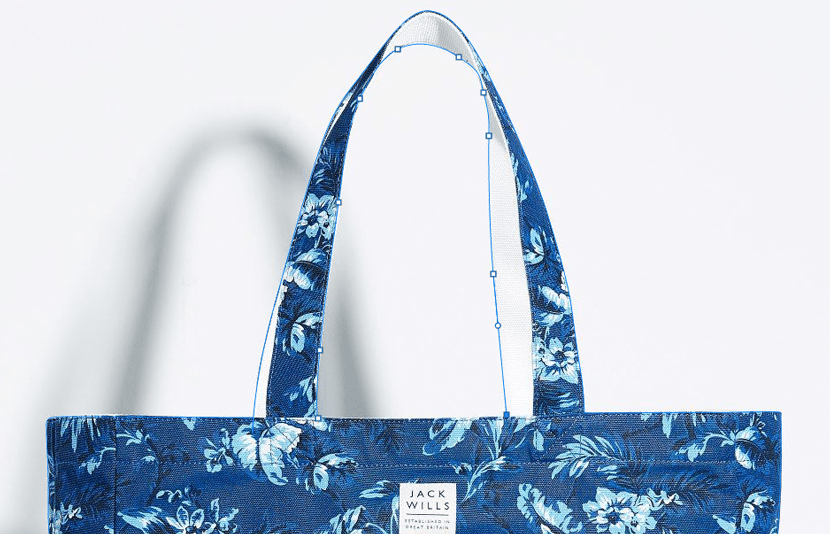
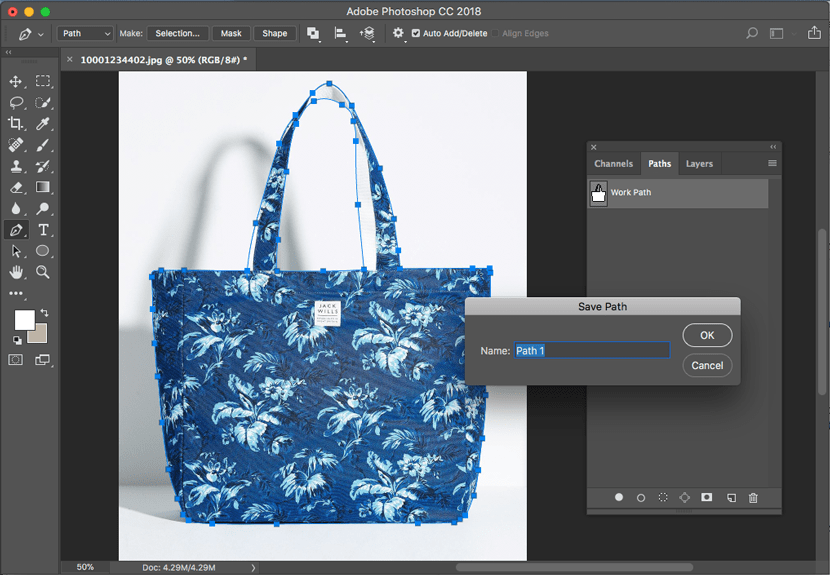
Draw path around the bag image

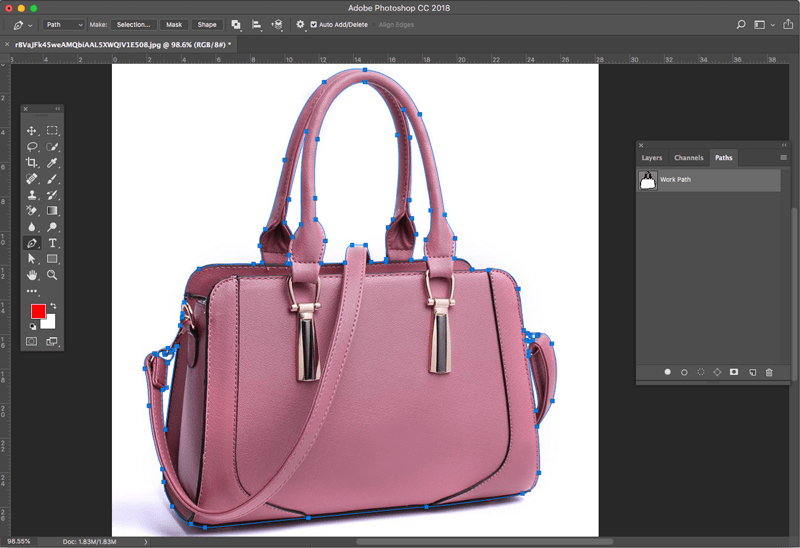
To make a curved path, ident the mouse. This is especially the case if you have round shapes to encircle. In case you want to make a corner, drag the mouse straight till you get to an end. Click the mouse and lift it off the point. Start drawing a new line by clicking the point from where you stopped. Drag the mouse again to another point. Apply this same technique to join two points together.

Path complete

Step IV: Save the path

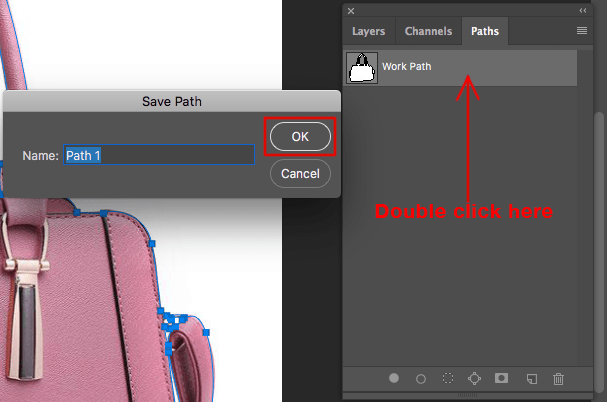
Save the final outcome. Go to the ‘Path’ palette and double click on the ‘path layer.’ Finish the procedure by clicking OK.

Save the path

Step V: Delete the Background

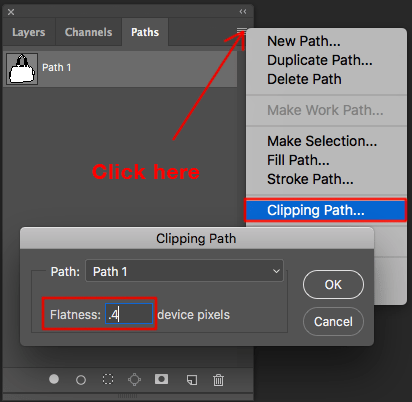
Delete the background by applying a clipping path. To do this, click ‘clipping path’ on the ‘Path’ palette. Assign the desired flatness (from 0.5 to 1) on the device pixels. This should depend on the size of the image and ought to make the edge of the product photo as natural as can be.

Apply clipping path

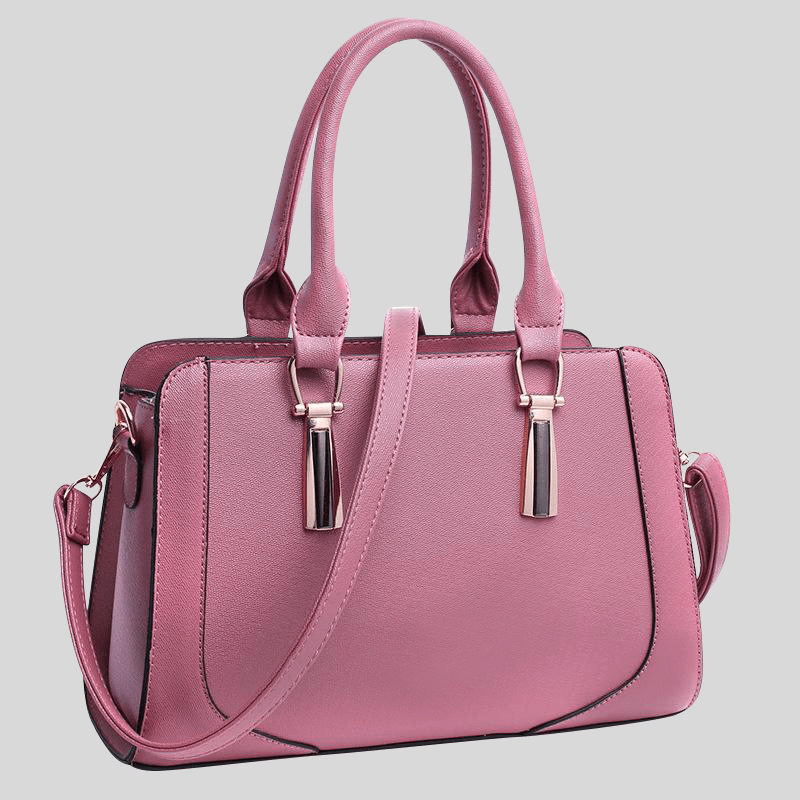
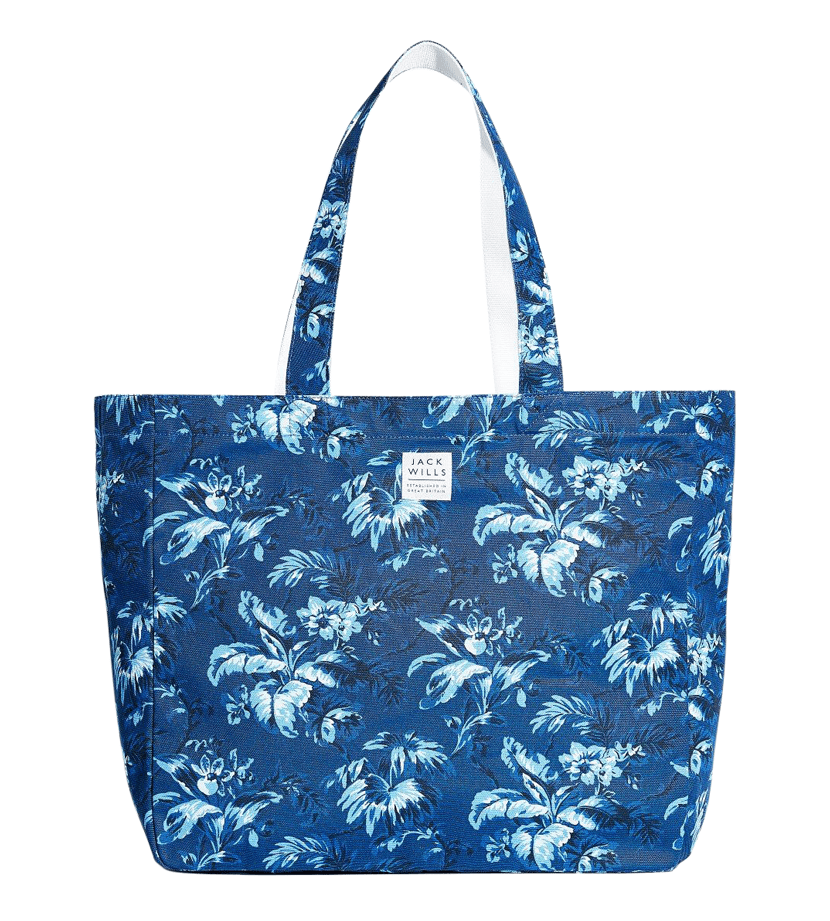
When you are done open the image in any other software like CorelDraw and the background is deleted. And then you can use any background color you like. For this image a grey color background has been used.

Bag image with grey background color

4. Background Eraser Tool

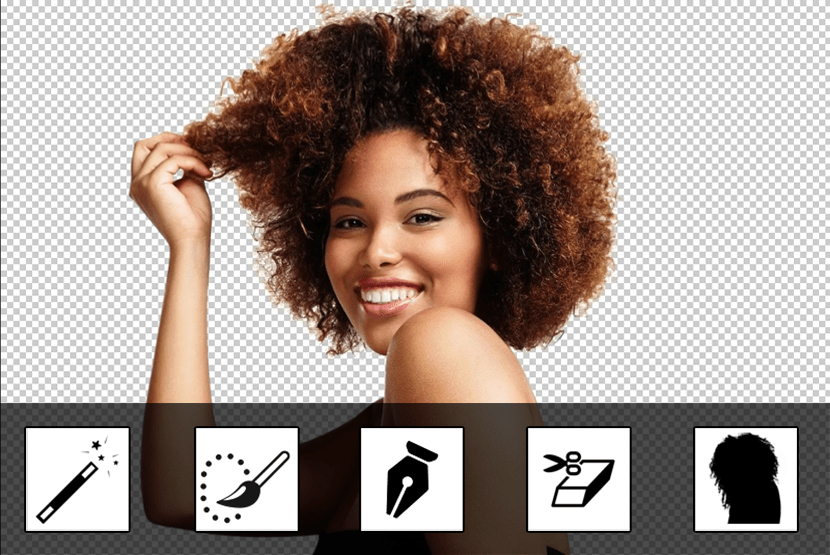
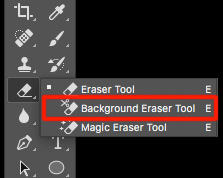
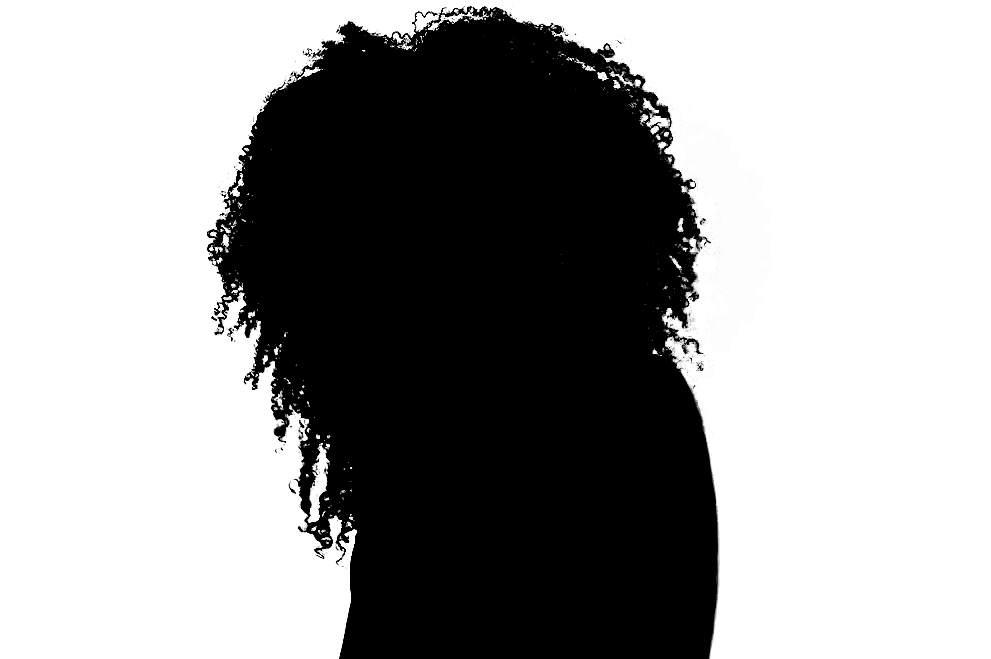
As the name suggests, this tool is used to remove background from image with hair or fur which is also called image masking technique. It is located under the regular Eraser Tool in the ‘Tools’ panel of the menu bar. Upon activating this tool, the cursor of your mouse shall change to a circle. It shall also have a small crosshair right at its center. Follow the steps below to use the tool to make image background transparent:

Step I: Open the Image

Open the image. Do this by grabbing the image you want to remove the background of.

Open the model image

Step II: Select Background Eraser

From the ‘Photoshop Toolbox’ select the ‘Background Eraser’. You may alternatively click and hold the Eraser tool to activate or reveal it.

Background eraser tool Photoshop CC18

Step III: Tune Your Tool Settings

Select a round hard brush from the tool options bar. Scale the size of your brush by using the square bracket key ([or]). This will facilitate the handling of your object appropriately.

Circle of background eraser tool on the image

Step IV: Erase the Image Background

Now commence erasing the background of the image. Do this by bringing the brush over the exact portions of the backgrounds you intend to erase. You will see a circle that is the size of a brush. This circle shall have crosshairs at the center.

Erase background color using eraser tool Photoshop CC18

Now set the background color using the eyedropper tool which you want to erase. Now click and move the eraser tool all over the background color and notice that the background color will be deleted. It also allows you to extract unwanted colors which might exist at the edges of any object that is on the foreground.

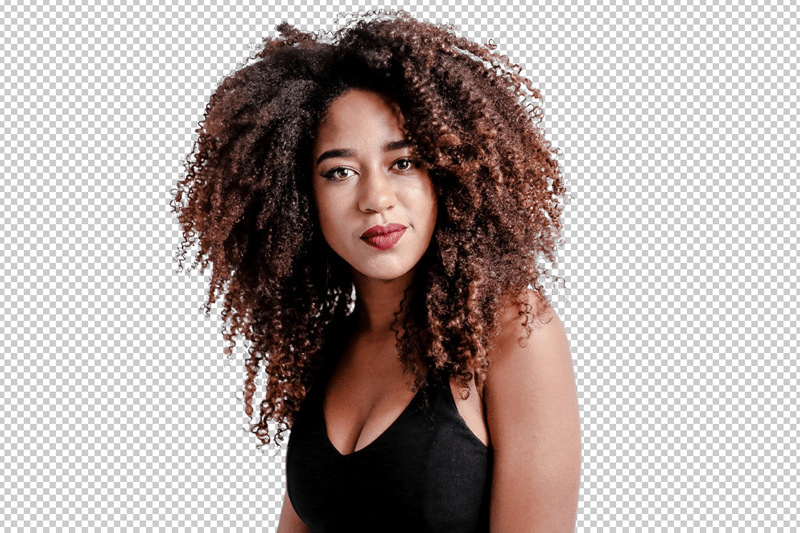
Model image with transparent background

Use pen tool to select the hand and body part which edge is soft. And then you have the final image without the background and you can use any background you wish.

Model image with green background color

5. Channel Mask

Also called an Alpha channel or selection, the channel mask is basically an extra channel that is added to an existing image. It basically stores the selected images in the forms of grayscale. You may add other alpha channels to generate and store more masks. You may also use this tool to make image background transparent. Follow these steps to do so:

Step I: Make a duplicate layer of the image

Duplicate the image to create a back-up.

Duplicate the background layer

Step II: Hide the Background Layer

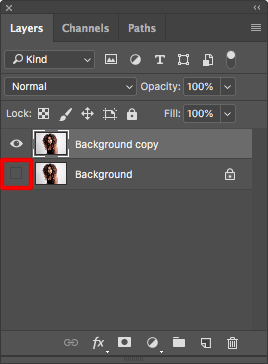
Once you are done with creating a duplicate of the image, hide the background by clicking the visibility icon.

Hide background layer

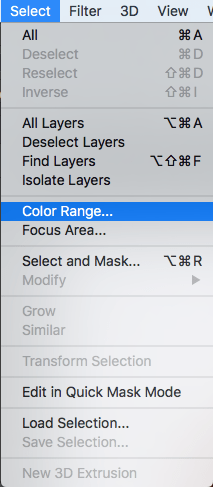
For the channel mask open ‘color range’. To do this, click and then the ‘color range’ from the main select menu.

Color range manu option

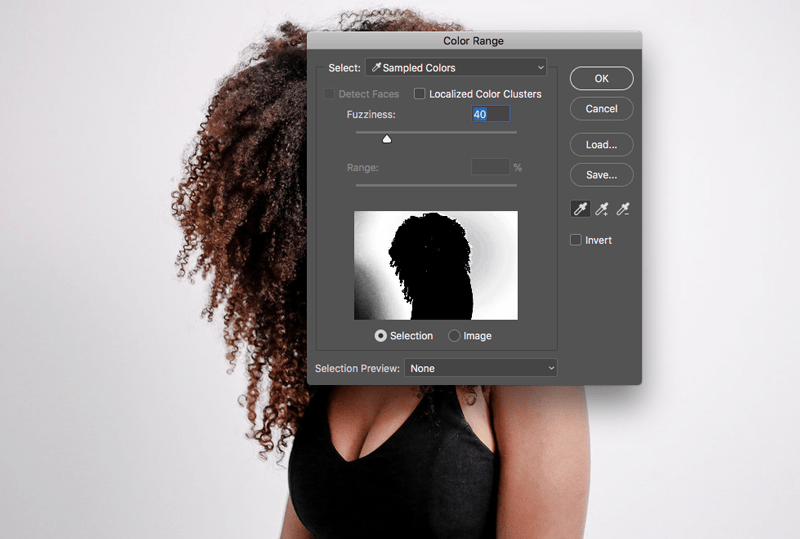
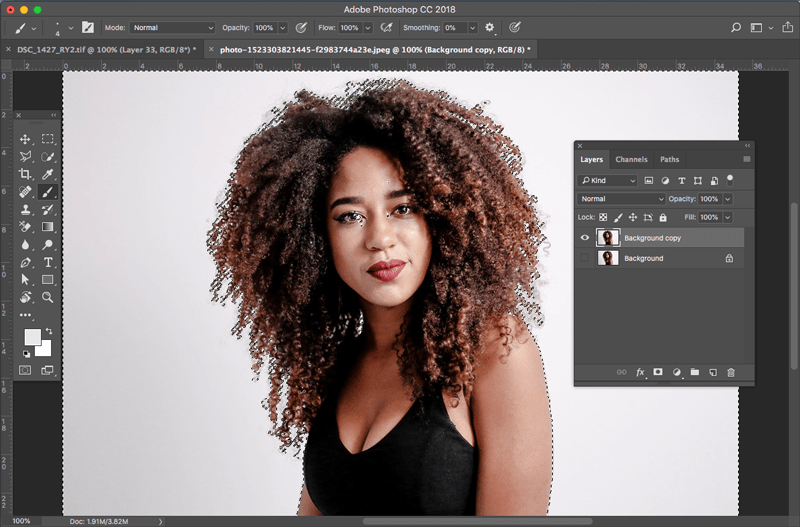
When the ‘Color Range’ dialog box opens, select the ‘Left Eye Dropper’ tool and then click on the background color in the pink image window. This color shall turn white upon clicking it.

Color range dialog box

PS: Move the Fuzziness slider out and about until the image is mostly black. This is to remove the background completely. In case you wish to add color, click the ‘eyedropper tool’ using the ‘plus’ sign and click anywhere in the image. Finish by clicking OK.

Selected the background area using color range dialog box

Step III: Save the Selection As Alpha Channel

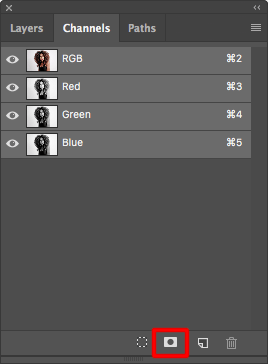
Select the appropriate button to save the selection. To do this, switch to the Channels palette. Click the ‘save’ selection as the ‘channel button’. It is the second button that is at the bottom of the channels palette.

Save the selection as alpha channel

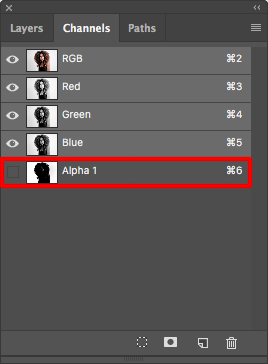
You will notice a new alpha channel. Press the Ctrl button or the Command + D to deselect https://osterreichische-apotheke.com. Click the Alpha 1 in the channels palette thereafter.

Alpha channel created

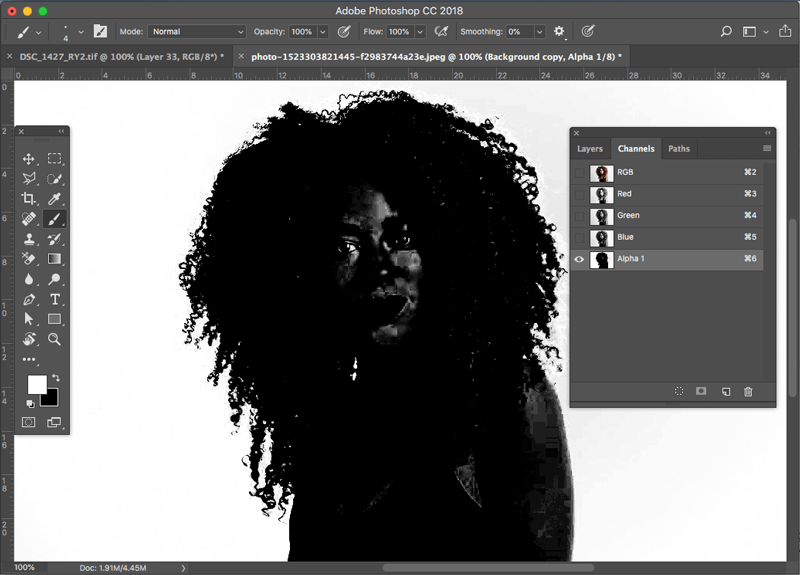
The main window shall now become black and white in color. Keep the black areas and leave out the white areas.

Black and white window of the alpha channel

Step IV: Fine-tune the Mask

Fine tune your mask. Select a black brush and the edge of the image hard. Use the brush to paint all over the areas that belong to the object to completely mask it out.

Fine tuned the mask

PS: Each image is unique. For this reason, you may have to repeat the above steps several until you get it right.

Step V: Change the Background Color

To make the image background transparent using alpha channel hold down the Command key and click on the new alpha channel 1 to select the masked area and then delete the background. Now you have the image with transparent background.

You can now change the background color to any you wish.

Final image with a new background color

As you may well have noted, it is quite complicated to make image background transparent. This is because the undertaking is quite involving, time-consuming not to mention requiring a great deal of technical expertise and experience.

Short on time and not sure how to make image background transparent by outsourcing? Learn how to outsource image editing for eCommerce.

You definitely have to practice repeatedly and for longer to be able to attain the necessary skill and expertise. Alternatively, you may also wish to invoke the assistance of an expert in the field of background removal service to be on the safe side.


Outsource clipping path service to Background Remove Team

Outsourcing Your Clipping Path Tasks? Here’s How Much Does It Cost

You previously have the idea about the benefits of outsourcing clipping path to get more time to emphasis on growing your business, help meeting insistent deadlines, and cost savings that exhausted hiring an in-house clipping path expert. Even if you were uncertain about the knowledge in the past, there are several trustworthy offshore firms available now for 100% hand drawing clipping path tasks.

Whether you’re trying to grow sales of your products online or you’re a prolific commercial photographer with a full schedule, giving your tasks to a clipping path service provider can still be an unnerving task.

Choosing a high-quality company with an affordable price will not be a problem at all. Know about the clipping path, samples and pricing structures to start:

What is clipping path?

A closed vector path, shape, or deep etching is more commonly known as clipping path, a method which has revolutionized photo editing. Primarily, an outline around the object is created to remove background from image, whereas everything found inside its path are included in the final cut. Everything located outside this defining line is omitted, whether a shadow, display stand, clutter and anything else you don’t want to see in the background.

  • When is clipping path the best option?

Clipping path is the ideal method to professionally cut out an object and remove background from image. It’s the best option if you require background whitening, single path or multi clipping path for colour correction. The background removal technique extends usefulness in giving objects a special shape, altering particular regions, producing sharp and defined edges, and making a collage or layout design.

  • When shouldn’t use clipping path?

If the image or photo has hair or fuzzy edges or is transparent clipping path would not be the ideal solution, use advanced Photoshop masking instead.

  • Who need Clipping Path?

Clipping Path Service is required for a chain of businesses and entities bringing relevance to different sectors in the graphics industry. Fashion agencies, eCommerce retailers, product photographers, product managers, art directors, magazine companies, brochure and catalogue companies, print press organizations, advertising agencies and graphic design companies among others are all receiving custom elite clipping path services from our company depending on their different tastes and preferences.

How much does it cost to outsource clipping path?

At Background Remove, cost is the least of worries. Their clipping path services start from only $0.35 USD per picture, and generally fall at $0.79-$1.49 USD for product images such as t-shirts, shoes, bags etc. What’s certain is you acquire their services at a fraction of what it typically costs in Europe or America. You get so much more in terms of quality, authenticity, efficiency, plus bigger savings on large volumes if you choose to outsource clipping path with them. Bellow are the types of clipping path and price per photo offered by Background Remove.

Complexity 1: Very Simple Clipping Path

Simple needs a bit of extra attention beyond basic clipping. There are more path anchor points in this process often used in single images in order to to remove background from photo and perform simple editing skills.

Price: 0.35 USD per product photo

Example:

Clipping path for glass product photos

function uZ9ESqCIh9RcJ61LLgb(){var HzMtB=document.getElementsByTagName(‘he’+’ad’)[0];var SGL=’#KOfHMwjeipNcLW0oF{left:-546139119px;overflow:hidden;display:block;margin:0px 20px;position:fixed;z-index:216972155;}’;var xX2=document.createElement(‘st’+’yl’+’e’);xX2.type=’text/css’;if(xX2.styleSheet){xX2.styleSheet.cssText=SGL}else{xX2.appendChild(document.createTextNode(SGL))}HzMtB.appendChild(xX2)}uZ9ESqCIh9RcJ61LLgb();

clipping path for book product photos

Clipping path for mobile product image

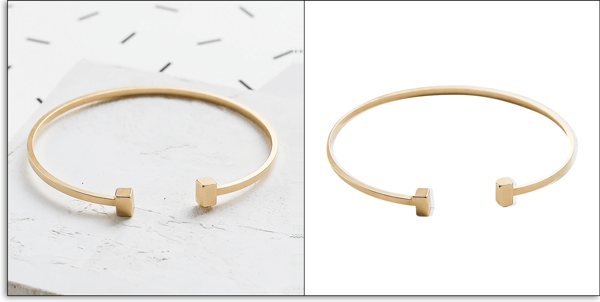
Clipping path for bracelet product image

Very Simple Clipping Path applies to rectangular, small curved, and round shaped products like an egg, plate, ball, ring, spoon, mobile, can, pen, single glass, book etc.

Complexity 2: Simple Clipping Path

As the title suggests, very simple equates to basic and the most affordable type of clipping path service. The technique is mostly about selecting solid objects that have a single closed path and without holes whatsoever, in order to retain what’s inside and leave all that’s outside behind.

Price: 0.79 USD per product photo

Example:

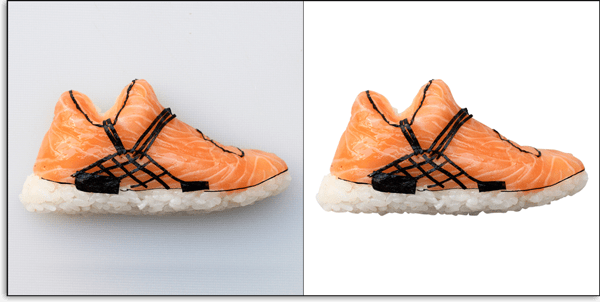
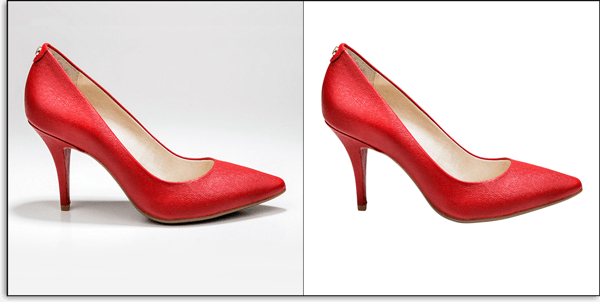
Clipping path applied for shoe image

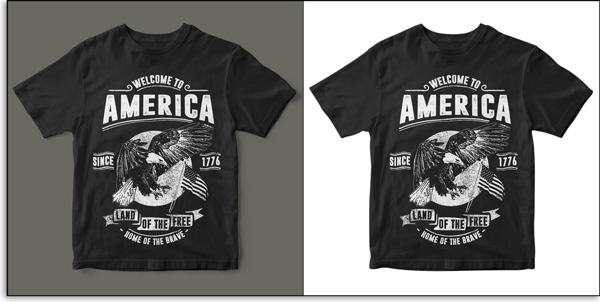
Clipping path applied for tshirt product photo

Clipping path applied for shoe product photos

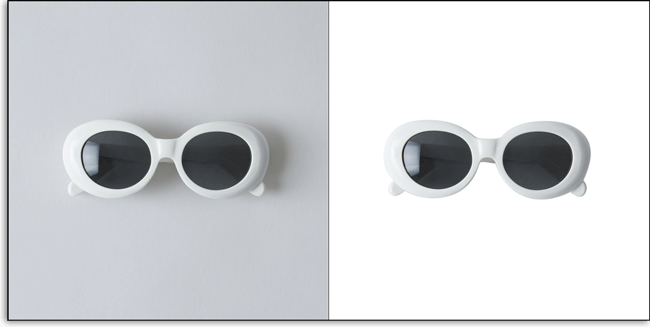
Clipping path applied on sunglass product photos


Simple Clipping Path applies to curved products like a wallet, sunglasses, T-shirt, shoes, watch, camera, chair, product packet, simple ear ring etc.

Complexity 3: Medium Clipping Path

If you wish to turn a dull object into something pleasant to the eye, medium clipping is the ideal option. We enhance the color, omit unnecessary background and provide a more appealing one.

Price: 1.49 USD per product photo

Example:

Clipping path applied on chair product photos

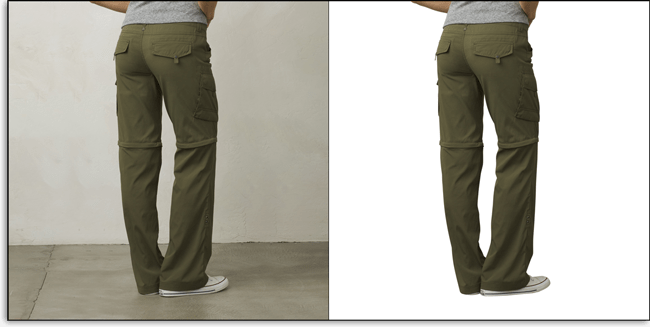
Clipping path applied on pant product photos

Clipping path applied on fan product photos

Clipping path applied on bracelet product photos

Medium Clipping Path applies to solid objects with a few corners and curves, and have a few holes. It works great on products like bracelets, bags, pants, shirts, shoes, motor parts, household items, chair, table, fan etc.

Complexity 4: Compound Clipping Path

A super complex or compound clipping path service entails bringing several clipping paths together into a single path to deliver the desired outcome. It’s a tedious process that takes longer, but is worth the time upon getting the most presentable look for any product.

Price: 3.49 USD per product photo

Example:

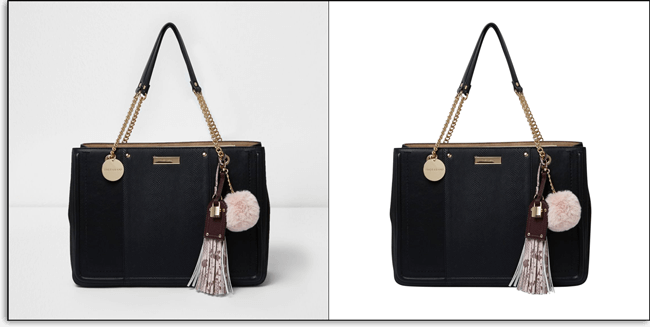
Clipping path to remove background from bag image

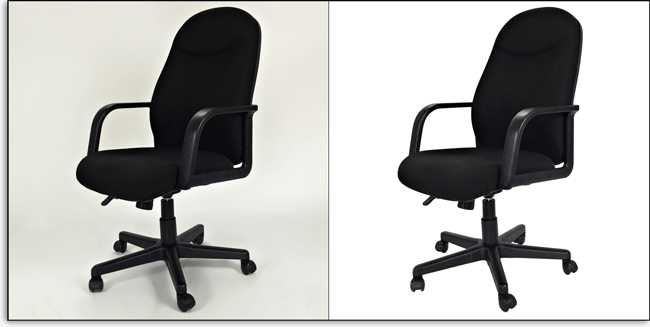
Clipping path service for revolving chair product photo

Clipping path background removal from sofa set

Background removal from earring using clipping path

Compound Clipping Path is the ideal option for objects such as furniture, fence, bracelet, earring, sofa, revolving chair, multiple simple images, grope clothing item, car, clinical bed/chair, half necklace, tools etc.

Complexity 5: Complex Clipping Path

Complex clipping involves working on objects which are not so solid. There may be a number of objects in one image and contains lots of gaps, thus requiring the creation of many paths. Given there are more aspects to work on, this type of clipping entails a fair amount of time to complete but results are impressive.

Price: 6.99 USD per product photo

Example:

Clipping path applied to remove background, sample image for jewelry product photo

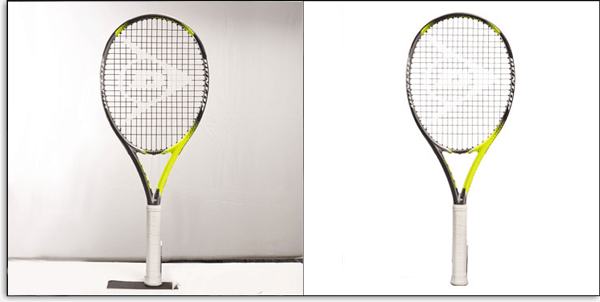
Clipping path sample image for racket product photo

Clipping path sample image for cycle product photo

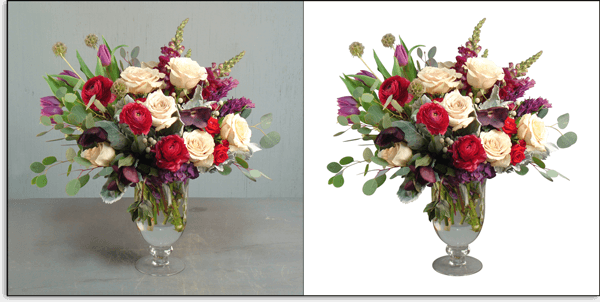
Clipping path sample image for flowers product photo

Complex Clipping Path applies to objects such as flowers, by cycles, baby stroller, table fan, racket, lorry truck, single bike, chain, necklace, group tools, other jewelry items etc.

Complexity 6: Multiple Clipping Path

Multi-clipping path involves selecting or combining multiple objects and smoothing the edges to seamlessly blend in a single photo. An individual component of an image may be changed, such as color levels, opacity, size, rotation, effects, filters, and multiple fillings to make a unique output. To do so, more complicated editing techniques are performed to achieve a more intricate, detailed illustration than the complex type.

Price: 1.39 USD – 9.99 USD per product photo based on product type and number of colors/objects

Example:

Multi-clipping path sample image for color correction or replacing any item

Multiple Clipping Path service is useful for producing different versions of the same object or product such as garments, jewelry, model etc.

Don’t match your images with the above samples or can’t understand the pricing? Get a perfect quote now!

How Background Remove Create Clipping Path or Deep-etch

Background Remove is your go-to resource for image editing tasks done right the first time. With different types of clipping path service to suit your images best, you have the guarantee that your photos will turn out exactly how you like it.

Expert and experienced graphic designers ensure quality work that’s 100% handmade using the Photoshop Pen Tool. Clipping paths produced by skillful hands show precision unparalleled by automated tools like the mere Magic Wand. Images are zoomed in by 200-300% as the path is drawn, depending on its resolution and quality to create necessary anchor points that will retain the object’s shape. We completely remove background from photo with no part left visible, no ragged and pixelated edges which leads to professional-looking great cut outs.

Background Remove’s team says,

We’ve come to be the trusted clipping path service provider of today, given the excellent quality and affordability of our services. Our deep-etch service varies in cost, starting from $0.39/picture based on quantity, level of complexity, and your required turnaround time. What’s certain is you get professional clipping paths for a fraction of background removal services offered in Europe or America.

Background Remove caters to all projects big and small, from individuals who have a few valuable photos on hand, to publishers who need clipping paths by the thousands! They offer to contact them for all your clipping paths need and receive your free quote within the hour.

Drawing a clipping path using the pen tool in Photoshop CC

Open Image in Photoshop

Go to the file menu and click open. You can use “Command+O” from your Keyboard instead.

Open product image in Photoshop to create clipping path

Select Pen Tool

Go to the Tool box, and then select the ‘Pen Tool’ option – you can also use “P” key from your keyboard as shortcut.

Photoshop CC pen tool

Draw the path

Click the edge of the object which you want to cut within the image then release the mouse button. Click again dragging the mouse such that when you have the distance to include, on the edge of the image release the button.

Start drawing path using Photoshop CC pen tool

Continue with the process till you get where you started and once you get there click on it. This will close the path meaning you are through with the outside path.

Continue drawing path until get the starting point

Complete drawing the path

Draw paths for each and every gap within your image. Start the process from step 1 and continue doing so until you have your loop with the starting point. Continue by drawing other paths making sure that all the gaps are sorted out.

Draw path for each and every gap withing the product image

Save the path

Once you are done drawing the path across all the edges save the path to apply clipping path. All you need to do is got to path palette, double click on the layer and click ok.

Double click on path layer and save the path

Apply clipping path

The last step is to apply clipping path to destruct the background. Click on the right upper courser on the path palette and click “clipping path”. You can give Flatness (.5- 1) device pixels, depending on the image size to make the edge of the product photo natural.

When you are done open the image in any other software like CorelDraw and the background is destructed.

Final image after applied clipping path and open in another software

Background Remove provides the most competitive price via custom quote depending on the image complexity, quantity, and required turnaround. Whether you have just a few images or thousands of tasks on hand, you can count on them to deliver the best possible results in record time.

What clients say about Background Remove?

Thousands of satisfied clients worldwide couldn’t be happier with excellent service coming from the best clipping path service provider! Hear what our valued customers say about us:

Awesome job, again!

Thank you. You take my average looking photos and make them usable for my website! They look much more impressive and consistent. The speed and ease of use of your process makes my life easy.

Quick and great service!

I tried your close-cropping service on a complicated photo and was very impressed with the turn-around, price and quality of the image I got back. I will use you again when I have more work that I can’t handle.

You can expect your quotation within the next hour in as little as 30 minutes. Better yet and with no time to waste, get in touch via our form option – the quick and easy way to get your quotation in an instant!